Thursday, April 22, 2010

Baby bella mushroom tart

051 v1

In Italy, France, eastern Europe and Russia, foraging for mushrooms in the spring and fall is a national pastime.   You know that the season is under way when neighbors behave strangely - avoiding eye-contact while discreetly wandering in the direction of the woods and emerging casually with a bounty neatly tucked out of sight in coat pockets!  Similarly, when you see cars parked in disarray on the side of the road, you can be pretty sure that scavengers are secretly searching for mushrooms in the damp woodland areas nearby.   Secrecy and protection of the fruitful sites are carried through generations, and it is rude to ask where where the mushrooms were found.

There is a magical quality to mushrooms.  I am always amazed at their instant appearance on my lawn after a rainy spell.  But because I’m mycophobic (like most of us in America) when surprised by mushrooms that have the potential of being poisonous, I don’t venture to even touch them, let alone consider eating them!  In Europe the attitude is decidedly mycophilic and children are taught to identify the edible from the poisonous at an early age.  If you are in France and there is any doubt in your mind, you can conveniently take your harvest to a pharmacist - they are all trained to identify them.

During our stay at the amazing Villa Ferraia in Tuscany, my wine group and I were treated to an afternoon of foraging in the cool, humid woods.   Amateurs at best, we were accompanied by an expert woodsman who spoke not a word of English and nodded ‘yes’, and ‘no’ to our findings.   Stefano is the culinary director at the Villa.   Here’s his find – a huge portobello!   Mushrooms flourish in humus, the decaying vegetation found on moist soil around trees and under brush. 

2006 09 Italy 117 v1

We were very fortunate to find a few ovoli mushrooms that day!   In researching for the name of this bright orange mushroom, I discovered that they are very rare.   They have brilliant orange caps and white stems and are very expensive to buy if you are lucky enough to find them at market.  

2006 09 Italy 126-crop v1

Always eaten raw, they were sliced thinly and wonderful paired with a local Chianti. 

2006 09 Italy 150-crop v1

Mushrooms can be called the ‘meaty’ vegetable because of their high protein content.  They can easily replace meat to balance a meal.  In this mushroom tart, I use dried porcini mushrooms and young portobello mushrooms, also known as ‘baby bellas’.   A little brandy and salty parmesan to the mix enhance the earthiness of this hearty tart.

004-crop v1

Baby bella mushroom tart

Adapted from the Torta Salata recipe in Bologna Mia by Loretta Paganini.  Serves 8

Tart dough

2 cups all-purpose flour

1 teaspoon sea salt

8 tablespoons unsalted butter, cubed in 1” pieces and chilled

2 egg yolks

5 tablespoons ice water

Filling

¼ cup dried porcini mushrooms, soaked in hot water to cover for 30 minutes (reserve water after draining)

2 tablespoons olive oil

1 small red onion, finely chopped

2 cloves garlic, minced

2 20 oz packages Baby Bella mushrooms, brushed clean of any dirt, stems removed and thinly sliced 

¼ cup brandy

1 - 1½ teaspoons sea salt (to taste)

1 teaspoon freshly ground black pepper

½ teaspoon red pepper flakes

¼ cup chopped fresh parsley

2 large eggs

1 cup whipping cream

½ teaspoon freshly ground white pepper

pinch of freshly ground nutmeg

1/3 cup parmesan cheese, grated

To make the tart dough:  Place flour, salt and butter in food processor (or bowl).  Pulse (or work quickly with your hands) until the butter is the size of peas.  Add egg yolks and ice water and pulse until the mixture forms a mass.  If it’s still dry, add more water, one teaspoon at a time.  Shape into a flattened ball and wrap in plastic or foil and refrigerate for at least 30 minutes.

Butter a 9” tart pan with a removable bottom.  Sprinkle lightly with flour.  On a floured counter, roll out the dough to about an 11” circle.  Carefully transfer the dough to the tart pan.  Pat the dough so that it is snug in the bottom and sides of tart pan and trim the excess from the edge of the pan.  Prick the bottom at 1” intervals with the tines of a fork.  Chill while you prepare the filling.

011 v1

To make the filling: Preheat the oven to 400ºF.  In a large saucepan, heat the oil.  Add the onions, garlic, mushrooms and drained porcini mushrooms.  Sauté over high heat for about 10 minutes, or until the vegetables begin to soften.  Add the brandy and porcini water and cook over low heat for about 20 minutes and the mixture begins to dry out.  Add salt, black pepper, red pepper flakes and parsley and combine. Remove from heat and allow the mixture to cool.

In a small bowl, whisk the eggs, cream, white pepper, nutmeg and parmesan cheese until combined.  Add to the cooled mushroom mixture and mix well.  Pour the filling into the prepared crust and bake for 35 – 40 minutes, or until deep golden brown on the top.

Cool on a rack and serve warm or at room temperature.

026 v1    Prijatno!

Thursday, April 8, 2010

Sautéed fresh garbanzo beans

030 v1

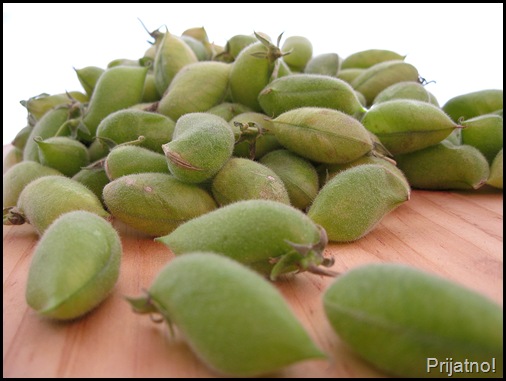
If you blink at the wrong time during early spring, you may miss the fleeting presence of fresh garbanzo beans, still in their small, fuzzy green pods.   Also known as chickpeas, ceci beans, Indian peas, Bengal gram and Kabuli chana, we are much more familiar in the US with garbanzos in canned or dried forms before they become the key ingredient in hummus, falafel, Indian vegetarian curries and Italian salads. 

I first spied fresh garbanzos as recently as last year.   Popping the beans out of their pods and savoring their green, sweet, and slightly nutty essence transported me far from the hectic, crowded city to a spacious country porch, a rocking chair and visions of me shelling garbanzos…I was well on my way to eating the entire bag by the time I arrived home!   Similar to green pea pods but smaller, their shells are thinner, hairy and paper-like.  One or two peas occupy each pod.  This picture shows how they are sold at markets in Mexico - fresh pods still attached to their branches.  The leaves are used to make sun tea and the branches are fed to the burros!   In the US you will pay a little more since you’re only buying the pods.   If you a lucky enough to come across some at your market or grocery store, grab some! 

This is how I found them

023 v1

Sadly, most of the crops in California support the dried garbanzo market.   Hopefully, with more families embracing a farm-to-table approach to their diets, these wonderful legumes will become a seasonal staple .   I recently read about a California farmer and his support of his Hispanic foreman’s “agricultural fantasy” - selling fresh garbanzos to “Gringos”!  When they introduced them at a market in San Francisco, Hispanic women delighted in the fresh crop, while the “Gringas” were not so easily charmed, especially put off by the chilling thought of, heaven forbid, shelling the beans themselves!!!  (Link to the entire article).     For people as particular as they are, sautéing them in their shells as I did below saves shelling time and they can be eaten like edamame – each person shelling his or her own.

In Mexico and from the Eastern Mediterranean to India, fresh garbanzos are eaten raw as well as cooked, and in many areas they are considered the poor man’s protein.  Aside from being high in protein, these nutritious little gems are also high in fiber and potassium .   My recent batch made it home with only a few beans eaten!   I decided to process them minimally so that they retain some of the raw “green” nutty taste that I hunger for.  A quick sauté did the trick for me, but you could also toss the pods in a little bit of olive oil and roast them at 425F for 25 – 30 minutes for a creamier texture.

055 v1

Heat a little bit of olive oil in a pan.  Carefully add the fresh garbanzo beans.  They will quickly begin jumping like popping corn!  

012v1

When the shells are charred on both sides, sprinkle with chile powder, cayenne pepper and kosher salt, to taste.  Finish with a squeeze of fresh lime juice.

058 v1

This simple snack is my entry to Magic Bullet To Go Giveaway, for which you can find details @ Fun and Food Cafe. You could win a Magic Bullet Food processor!  It’s easy!

Prijatno!

Sunday, April 4, 2010

Easter Babka

028 v1

This magnificent babka is a traditional Polish Easter bread that I made for my best friend’s annual Easter celebration.  Standing six inches tall, it is a slightly sweet yeast cake dotted with rum-soaked golden raisins and topped with a sweet lime glaze.  Rich in flavor thanks to 10 egg yolks, 2 whole eggs and melted butter, this babka is a fine way to break the Lenten fast!

Babka is the Northern Slavic word for “little grandmother”.  The bread is baked in a special pan that shapes the babka to emulate a full skirt covering the ample hips of a typical Eastern European grandmother.   The pan has ridges and curves suggesting the pleats and flowers of the fabric.  Unfortunately I don’t own a babka pan, so my large angel food cake pan became an acceptable stand-in.  

Thanks, Dorota for allowing me to make your babka this year!   Your Easter feasts are well-known and always a joy.

042 v1


Babka (adapted from Valinda’s recipe on Allrecipes)

1/3 cup rum, optional – if you want to soak the raisins*

3/4 cup golden raisins

1 cup milk or half-and-half

1/2 cup water

1 tablespoon sugar

2 1/2 (.25 ounce) packages active dry yeast

2 eggs, room temperature

10 egg yolks, room temperature

3/4 cup unsalted butter (1 1/2 sticks), melted and cooled but still warm

2 teaspoons vanilla extract

2 teaspoons lime zest

6 1/3 cup all-purpose flour, plus about 1 cup more for kneading

*If you want the raisins to be plump and delicious, soak them in the rum the night before or at least 2 hours before you start the recipe. 

Warm the milk, water and sugar until it reaches 110F (45C).    Add yeast and set aside for about 5 minutes.   Lightly oil a large bowl and set aside.   Drain raisins and enjoy the rum while you bake!

Stir 2 eggs, egg yolks, butter, vanilla and lemon rind in a large bowl of a mixer.   Using the paddle attachment,  mix in yeast mixture and raisins and beat well.   When a loose dough has formed, turn out onto a well-floured floured surface and knead until smooth, about 10 minutes, using the extra 1 cup of flour if necessary.   Place the dough in the oiled bowl and turn to coat on all sides with the oil.   Cover with a damp cloth and let rise in a warm place until doubled in volume, about 45 minutes.   Deflate the dough by punching it down and folding it over onto itself about 4 times.   Let rise again until doubled in volume, about 30 minutes.

Grease a babka pan or a large angel food cake pan.  Deflate the dough again and turn it out onto a lightly floured surface.   Shape it into a fat cylinder.  Place it into the babka or cake pan and fold over the ends.   Smooth the top with your hands until the dough is evenly dispersed.   Cover the pan with a damp cloth and let the dough rise until tripled in volume, about 40 minutes.  Meanwhile, preheat oven to 375F (190C).

Bake in preheated oven 10 minutes. Reduce oven temperature to 325F (165C) and bake for 30 minutes more. Reduce oven temperature to 275F (135C) and bake for another 15 to 20 minutes, until golden brown.   Let babka stand 5 to 10 minutes before removing from pan and cooling on a rack.

The Icing

2 cups confectioner’s sugar

2 tablespoons milk

1 teaspoon lime zest

1 tablespoon lime juice

1 teaspoon vanilla

Mix above ingredients together.  Add more milk or sugar to achieve a pouring consistency.  Pour over the warm babka. 

047 v1

Peace and joy as we celebrate our Lord’s resurrection today! 

Hristos voskrese!

Prijatno!

Thursday, March 25, 2010

Avocado and poblano pepper omelette

028 v1

Everyone knows that I’m a huge fan of avocados, so much so that I have even experimented with it in a cheesecake!  Sunny South Africa, where I spent my formative years, was abundant with many varieties of fruits and vegetables and amongst them was the wonderful avocado.   My parents, young immigrants from the former Yugoslavia, had never seen an avocado, paw paw (papaya), granadilla (passion fruit) or guava before and gradually incorporated these nutritious and heavenly fruits into our diets (mom’s fruit salads were always the best!).  My father, upon his first taste of the avocado, deemed it needed salt and pepper, and from then on, my mother made sandwiches with mashed avocado, salt and pepper and they were simple but very tasty.  A wholesome food such as the avocado doesn’t need much primping, according to mama!  I still enjoy these sandwiches and the memories they evoke.

A long time staple of the middle Americas (earliest evidence of it is from 10,000 BC!), the avocado tree is native to the tropics.  The mild-flavored flesh is almost always consumed raw in salsas, dips and salads.   High in monosaturated fats (the best kind) and potassium (the mineral that keeps those pesky leg cramps at bay!), the avocado is also a factor in reducing cholesterol and consistently appears at the top of many healthy food lists. 

I try to incorporate it in our salads, sandwiches, tacos and another salad, and now, in a delicious omelette.  The buttery, rich texture of the avocado lends itself well to this preparation.  As it warms, its subtle flavor and creamy texture contrast with its surroundings -  bold onions, sweet red peppers and spicy poblano.  I highly recommend it!

The headliners…chopped cilantro, red onion, jalapeno, red pepper, poblano pepper, green onions and avocado:

001-crop v1

Sauté the vegetables in a pan.  When they are starting to soften, pour the beaten eggs over them and sprinkle with salt and pepper to taste

011 v1

013 v1

Using a wooden spoon or a spatula, push the egg mixture from the edges inward and tilt the pan so that the runny raw egg from the middle falls onto the pan and starts to cook.  Cover half of the egg mixture with the cheese of your choice and the avocados, and then flip the exposed end over to enclose them. 

020 v1

022 v1

Avocado omelette

For 2 very generous portions (we like our eggs, what can I say!)

¼ red onion, chopped finely

1 jalapeno, seeded and chopped finely

1/3 red bell pepper, chopped finely

1 green onion, thinly sliced

¼ cup chopped cilantro

4 eggs, beaten

salt and pepper, to taste

½ avocado, seeded, peeled and cubed

2 slices provolone cheese, mozzarella, feta, chevre, cream cheese, or whatever cheese you fancy that would melt quickly

Have all of the above ingredients prepared before you begin to cook the omelette.  Over medium heat, heat about a tablespoon of olive oil in a saucepan.  Add the onion, jalapeno, red bell and sauté for about 3 minutes.  Add the green onions and  cilantro and cook for about 2 more minutes.  Spread the vegetables out evenly in the pan. 

Pour the beaten eggs over the vegetables evenly.  Sprinkle with salt and pepper.  Let eggs cook for about a minute or two (the edges will be cooked but the top will still be raw).  Using a wooden spoon or a spatula, push the egg mixture from the edges inward and tilt the pan so that the runny raw egg from the middle falls onto the pan and starts to cook.  Cover half of the egg mixture with the cheese of your choice and the avocados, and then flip the exposed end over to enclose them.  Remove from heat and cover with a lid.  Allow to sit for about 5 minutes so that the cheese melts and the avocado warms. 

Crispy egg, spicy peppers, gooey cheese and warm avocado makes for a delicious breakfast!

025 v1

Prijatno!

Saturday, March 13, 2010

Sarma (cabbage rolls)

123 (2) v1
If you are of Eastern European heritage, one of your favorite winter meals is bound to be sarma.   Sarma varies from region to region and family to family, but the basic ingredients are meat wrapped in fermented cabbage leaves and flavored with smoked pork.  It is made with ingredients taken from the food that was prepared for the long cold winters – known as zimnica  in Serbia.  It has become the comfort food my family longs for at the beginning of winter.  It is the comfort food that my extended family and friends share at our Orthodox Christmas and other gatherings.
Kiseli kupus (sauerkraut) is the key to authentic sarma and can be easily made at home.   Even during our milder Texas winters, my father has had much success with the process.   People have been fermenting cabbage leaves since ancient times.  In remote villages it was a way to preserve food during the cold winter months when fresh vegetables were not readily available.   For my parents, homemade kiseli kupus is superior to the store-bought product and it’s the only sauerkraut they use for their sarma.  It’s a wonderful sight to see the pride in my father’s face when he offers his sauerkraut and smoked pork ribs and neck for sarma. 
My college-age kids requested sarma at the same time a local food critic asked me for the recipe.  My mother follows no written recipe, only the knowledge that it is best made with fermented cabbage leaves, lean meat with a little bit of rice, a generous amount of freshly ground pepper and sweet paprika, and smoked pork to add a depth of flavor to the clear broth.  Tomatoes are not part of mama’s sarma as she believes the acidity in the tomatoes would mask the distinctive flavors of the sauerkraut and smoked pork.  
We spent a wonderful morning together, mama and me.   We cooked and I measured each ingredient as we progressed, and when the sarma was ready, it was packaged and ready to be delivered to my kids who love their Serbian heritage and sarma!
126 (2) v3
First, you get your human pepper grinder to work.  You need lots of freshly ground black pepper.  Here is our sauerkrautier and meat smoker par excellence - my dad!
002-crop v1
Smoked pork neck (left) goes in the filling, and the ribs flavor the sauce.  It’s important to have ample amounts of Turkish coffee on hand when making sarma:
009 v1
Smoked pork ribs flavor the sarma and broth.  When these cook for 3-4 hours, the meat is very tender and falls off the bone.  You can trim the thick skin if you wish, but remember that a lot of flavor is in the fat.
021 v1
Fermented cabbage leaves, rinsed and draining:
015 v2  
To roll each sarma, cup the leaf in the palm of your hand.  Fill with about 3 tablespoons of the meat mixture:
024-crop v2
Fold one side over without straightening the ends:
025 v1
Then the opposite side, but don’t straighten it at the end: 
026 v3
 Fold the thick end over and roll:
027 v1
Keep on rolling!
028 v1
When you get to the end, tuck the ends into the sides created by rolling.  This way, the sarma won’t unravel as easily.
030-crop v1
 Stack them as you go, the largest ones in one pile, medium in another, and small in a third pile: 
037 v1
In your biggest soup pot, cover the bottom with a layer of the leaf rejects.  Arrange the largest sarme (plural) in a snug fashion:
043 v1
When you’ve reached the top, nestle in about 6 smoked ribs:
049 v1
Fill the pot with water but don’t cover the top layer.  Sprinkle with lots of paprika.
053 v1
Cover the top layer of sarme with more of the leaf rejects.  Cover with the lid and simmer for 3-4 hours. 
054 v1
Sarma
Makes 78 sarme (plural) 
3 large onions, finely diced
canola or olive oil
6 oz smoked pork, diced. Pork neck is the best – see picture of the smoked meat.
5 lbs ground beef (about 92% lean)
2 tablespoons salt
1½ cups long grain rice
½ cup ‘sweet’ ground paprika, plus more for sprinkling the top
3 tablespoons freshly ground black pepper
78 fermented cabbage leaves (recipe below, or you can purchase them at your local imported goods store)
About 6 smoked pork ribs
Please note a slight change in the method below (changes in bold). We no longer sauté the meat beforehand, only the onions. 
On medium heat, sauté diced onions in a little canola or olive oil until they are soft and starting to turn brown. Remove from heat and add diced pork and stir briefly. Increase heat to high setting and Add ground beef. Brown quickly to retain the juices. Add salt, rice, paprika and pepper and combine well.
Rinse excess salt off cabbage leaves and allow to drain in a colander. Separate the smaller, broken leaves and set them aside. For the larger leaves: trim the thick middle vein with a sharp knife or kitchen scissors without cutting through the leaf. They will be easier to roll that way.
For each cabbage leaf: fill with about 3 tablespoons of meat mixture. Roll in the palm of your hand by following the photos above, or place each cabbage leaf on a cutting board, and then fill and roll with both hands. Stack sarme on the side until all are rolled.
Drizzle a little oil on the bottom of a large stock pot with a wide base. Using the small, broken cabbage leaves, line the bottom of the pot with a single layer. Arrange sarme seam end up and close together on top of the cabbage leaves. With the seam end up, the sarme will stay intact when you scoop it out underneath it with a spoon when you are ready to serve them. Continue layering sarme until they are all in the pot.
Nestle the ribs in the top layer and fill the pot with water almost to cover the top sarme. Sprinkle generously with more paprika and cover sarme with leftover cabbage leaves.
Bring to boil over medium heat. Reduce heat to low and allow to simmer for 3-4 hours. 
To serve:  Carefully spoon 2 – 3 sarme per person, and rib meat into a bowl.  Ladle some of the broth into bowl.  Serve with warm crusty bread.
Kiseli kupus (sauerkraut)
To make sauerkraut, start with heads of cabbages that have the greenest outer leaves. Wash and remove the damaged leaves and discard. Core the cabbages (the core is delicious eaten raw). Stuff the hole with plenty of salt, pushing it in as tightly as you can. The salt will act as a preservative and prevent decay.
Place the cabbages in a barrel or plastic container large enough to fit them. My parents use a garbage can especially for this. Fill the barrel with water and a very generous amount of salt. You will be rinsing the cabbage leaves off later, so don’t be shy about adding plenty of salt.
Cover the cabbages with a large pan or plate and weight it down with a rock. Place lid on container. Place in the coolest part of the house or garage.
EVERY DAY for 3 weeks, the cabbages must be turned and shuffled in the container. This will prevent spoilage and keep the salt evenly dispersed. The sauerkraut will be ready in 3 weeks for sarma.
sarme 2-2010 018 v1
Prijatno!

Thursday, March 4, 2010

Apple galettes with Vanilla bean goat’s milk ice cream and Blue Heron Farm cajeta

010-crop v2

I have never met a goat cheese I didn’t like!  Who can resist the rich layered cake-like wonder that is Humboldt Fog, a perfect French crottin or the red wine-soaked Drunken Goat?   I’ll never forget my first taste of chèvre.  It was a young crottin, covered in chopped walnuts and then toasted so that the cheese was warmed through. It garnished a green salad at lunch years ago at the Château de Chenonceaux in the Loire Valley.  The setting: perfect, the chèvre: a revelation!

Blue heron farm goatBut I had never tasted fresh raw goat’s milk until recently.  It is marvelous!   While preparing for a dinner for our wine group, I visited Blue Heron Farm in Field Store Community near Waller, Texas.  Owners and artisans Lisa and Christian Seger were our special guests and provided their highly regarded chèvres for several items on the menu.  Expecting a gaminess beyond what my cow’s milk-trained palate could savor, I poured some over my granola for breakfast and was blown away by the mild sweetness and ever so subtle tang (which becomes more prominent when the milk is transformed into chèvre).  It was a delicious treat I enjoyed all week.  .

SPOILED GOATS, FRESH CHEESE exclaims the banner at the entrance to the Seger’s ten-acre property.  Forgoing quantity for quality, they have chosen the sweet-natured, long-eared Nubian goats that produce milk that is high in butterfat and mild in flavor.  It’s kidding season, and after meeting the adorable babies and their curious mamas, I left with a variety of creamy chèvres, cajeta (caramel) for dessert, and two quarts of freshly harvested goat’s milk.   The milk that I didn’t consume with breakfast I used to make a lovely Vanilla bean ice cream (recipe below). 

If you live in the Houston area you can find the Seger’s chèvre at several outdoor markets.  I suggest you reserve your portion…they are always the first to sell out!  You can also arrange for a tour and tasting at the farm. 

Our dessert was warm individual Apple galettes made by our friend Helen.  Vanilla bean goat’s milk ice cream and Blue Heron Farm cajeta were the perfect accompaniments.  If you have never tasted cajeta from Blue Heron Farm, I urge to do so!  It’s always fresh, all natural and contains no fillers.  It’s the perfect pouring consistency and I admit that I’m addicted to it!

Vanilla bean goat’s milk ice cream

Makes 1 1/2 quarts

1 cup sugar

2 tablespoons cornstarch

2 pinches of salt

4 cups fresh raw goat’s milk (No guarantee that it will be good with commercially produced goat’s milk)

½ vanilla bean pod

2 eggs

Bring a little water (about ½”) to a simmer in the bottom of a double boiler.  Whisk sugar, cornstarch and salt in the top bowl of a double boiler. Place on top of simmering water.  Slowly add goat’s milk, whisking continuously until the mixture is hot and thickens a little, about 20 minutes.

On a cutting board, split the vanilla bean pod in half lengthwise with a pointed knife.  With the sharp tip of the knife, scrape the vanilla seeds (caviar) out and add the bean pod and seeds to the milk mixture.

Beat eggs in a separate bowl until the yolks and whites are combined.  Ladle about ½ cup of the hot milk into the eggs and whisk together quickly to prevent them from curdling.   Add the eggs to the rest of the milk mixture and cook over the simmering water for an additional 5 minutes, but make sure that it doesn’t boil.

Cool milk custard in an ice water bath, stirring every few minutes.  Chill overnight in the refrigerator.

Strain the chilled custard through a sieve and discard the vanilla bean.  Freeze the custard by following the directions to your ice cream maker.

 010-crop v3

Apple galettes

Adapted from Susan Spungen’s Almond Berry Tart  from More magazine.  Makes 8 galettes.

Crust

½ cup sliced or slivered almonds

1½ cups flour

½ teaspoon salt

1 teaspoon sugar

1½ sticks cold unsalted butter, cut into small pieces

¼ cup ice water

Filling

4 cups thinly sliced peeled, cored and quartered apples

½ lemon, juiced or 2 tablespoons

½ cup sugar

2 tablespoons all-purpose flour

For the top

Sliced almonds

Coarse ‘crystal’ sugar or Turbinado sugar

To make the crust, combine the almonds, flour, salt and sugar in food processor.  Pulse to combine.  Add butter and pulse until the pieces are the size of peas.  With the machine running, quickly add the water.  Stop the machine just when the dough begins to come together.  Remove the dough and knead once or twice.  Shape into a disc and wrap in plastic.  Refrigerate for at least 1 hour.

Preheat oven to 375F.  Line a large cookie sheet with parchment or a silpat.

In a medium bowl, combine the filling ingredients. Set aside.

On a well-floured surface, cut the dough into 8 equal pieces.  Roll each piece with a rolling pin until it measures about 6 – 7 inches.   Pile sliced apples evenly on each piece of dough, leaving a 2-inch border. Fold the border over the filling, leaving some of the apples exposed.  Brush the dough gently with cold water and then sprinkle with crystal sugar and sliced almonds.

Bake until the crust is golden brown, about 30 - 45 minutes.

Remove from oven and let cool for 5 minutes before serving with goat’s milk ice cream and cajeta.

020-crop v1

Prijatno!

Thursday, February 18, 2010

Meze (Mezze)

032 v1-crop v2

Meze (Serbian), mezze (Arabic), and mezé (Greek), are the Eastern Mediterranean appetizers similar to Spanish tapas.  Derived from the Persian word maze ‘to taste or snack’, meze consists of plates that are a feast for the eyes.   Small bites and dips that are varied in texture, flavor and color, in my native Serbia they are traditionally served with rakija (fruit brandy).  

Of all the Slavic nations, the Southern Slavs are the most hospitable…believe me, I’m not partial…and there is no better way for them to demonstrate their warmth and generosity than through an offering of food.  Even unannounced guests are treated like family, and there is always more than enough to go around come see my parents’ leftovers sometime!   Serbian meze may include pršut (prosciutto), salama, kobasica (sausage), kajmak (clotted cream) and ajvar (red pepper relish).   For the sake of this Daring Kitchen challenge and our hostess, I am keeping it vegetarian with Middle Eastern mezze.   

My friend Chantal and I spent an enjoyable day baking pita bread and bringing the meze plates together.  She has an interesting collection of dinnerware  – many choices for the amateur photographer!  Just look at those pretty yellow ‘triple bowl’ dishes above.    Adorable, and perfect for meze!

In the  picture above you will find (counterclockwise from the top):  sliced radishes, kalamata olives, walnuts, preserved limes (I just happen to make a jar with Mexican key limes a couple of months ago), hummus with olive oil and a sprinkling of paprika, cucumber raita, hummus again, and pita bread.  Feta cheese cubes are in the middle.

DBKitchen logo The 2010 February Daring Cooks’ challenge was hosted by Michele of Veggie Num Nums.  Michele chose to challenge everyone to make mezze based on various recipes from Claudia Roden, Jeffrey Alford and Naomi Dugid.

The second plate below (from the top) consists of my favorite dip of all muhammara (I will post the recipe soon), pita bread, potatoes with olive oil and lemon zest, and yoghurt cheese sprinkled with dukkah (a blend of sesame seeds, spices and nuts).  Be forewarned:  there are healthy quantities of fresh garlic in the dips and falafel.  So much so that Husbie and I were able to created enough fumes to ward off the vampires and every disease under the sun for a few days now! 

007-crop v1

Pita Bread

Adapted from Vefa’s Pita Bread, found at Kalofagas

Serves 8

2½ cups all-purpose flour

1 tsp. salt

3/4 cup warm (body temperature) water

2 Tbsp. olive oil

1 Tbsp. active dry yeast

1 tsp. sugar

coarse cornmeal for dusting the dough

vegetable oil for greasing the pan

Combine the flour and salt in a large bowl. In a smaller blow, combine the warm water, olive oil, yeast, and sugar and let stand for five minutes or until you see that the yeast is active.

Using your hands, gradually add the wet ingredients into the dry ingredients and knead with your hands until the dough pulls away from the sides of the bowl. Cover and leave in a warm spot to rise and rest for about 30 minutes.

Divide dough into six pieces and roll out into 6 - 8 -inch rounds that are about 1/4 inch thick. Dust both sides lightly with cornmeal and poke the surface of your pita breads with the tines of a fork. Stack the dough rounds until you are ready to cook the pita bread.

Place a heavy cast-iron skillet (non-stick pan is fine) and heat to medium-high. Pour a little vegetable oil in the skillet and brush to cover the bottom. Carefully place one pita dough in the hot skillet. Cook for about 3 minutes and turn over when you see bubbles forming in the bread.

Place fried pita breads on to a large cotton kitchen towel and cover. Repeat with the rest of the dough, stacking them as you go. Serve warm with falafel or cut into triangles with the various dips and meze.

016-crop v1

Cucumber Raita

adapted from The Indian Grocery Store Demystified by Linda Bladholm

1 medium cucumber, peeled and most of the seeds removed
¼ teaspoon ground cumin
2 cups plain whole milk or Greek yogurt
1 garlic clove, peeled and minced
fresh coriander and/or mint, chopped, to taste

cayenne pepper or paprika, for the garnish (optional)

Dice the cucumber. Blot off excess moisture with paper towels.
Add cumin, yogurt, garlic, coriander and/or mint. Chill until ready to be served. Sprinkle with cayenne or paprika before serving.

Serve with falafel (above) or pita bread as part of meze (below).

008-crop v1 

Yogurt cheese sprinkled with Dukkah

To make yogurt cheese, line a medium sieve with two to four layers of cheesecloth (this depends on the weave:  more layers for a loose weave, fewer layers for a dense weave).  Place the sieve over a bowl.  Spoon 2 cups of plain whole milk or lowfat yogurt on the cheesecloth.  Cover with the excess cheesecloth and refrigerate overnight.   When ready to serve, unmold and sprinkle with dukkah.  Serve with pita bread triangles.

Dukkah

Adapted from Claudia Roden's book, The New Book of Middle Eastern Food and found on Michele’s blog with my adaptations in italics.

1 cup sesame seeds    I made half a recipe, 1/2 cup sesame seeds
1 3/4 cups coriander seeds   I added 2 tablespoons
2/3 cups blanched hazelnuts   I used 1/3 cup raw almonds
1/2 cup cumin seeds   I used 2 tablespoons cumin seeds
1/2 teaspoon salt 
1/4 teaspoon pepper
Put each variety of seeds and nuts on a separate tray and roast them all in a preheated 350F oven for 10-20 minutes, until they just begin to color and give off a slight aroma. As they take different times, you must keep an eye on them so that they do not become too brown, and take each out as it is ready. You could also roast them in a frying pan. Put them together in the food processor with salt and pepper and grind them until they are finely crushed, but be careful not to over-blend them into a paste.
To serve, sprinkle a little dukkah on the yogurt cheese or pour a little oil on small slices of bread and sprinkle with the dukkah.

038-crop v1

For the hummus, falafel and preserved lemon recipes, please go to Michele’s blog.

This post will be submitted to Susan’s blog Wild Yeast, for her weekly showcase of yeasted foods: YeastSpotting!

Prijatno!