Showing posts with label vegetarian. Show all posts

Thursday, March 31, 2011

Shubhra Ramineni’s “Palak” Paneer

006 v2

I first met the genteel and beautiful Shubhra Ramineni at a pasta class hosted by fellow Chowhound Jay Francis.  With her handsome husband and the cutest baby in tow, she graciously allowed us a first look at her cookbook, Entice with Spice, Easy Indian Recipes for Busy People which was in the process of publication. 

imageUpon opening the book, I was greeted by a collage of family photos, travel images of India and of course, Indian food and markets.   Particularly catchy to me was a colorful map of Shubhra’s motherland citing family members’ birthplaces, notable monuments and regional food products.  What followed was a listing of over 90 recipes and a veritable account of how a successful engineer became a cook and author:  it came from a need to drop the unhealthy eating habits she had developed as an overworked corporate individual and go back to the nutritious diet on which she was raised.  

Shubhra naturally turned to her family for recipes and developed them with a busy lifestyle in mind.  The novice cook will find an invaluable 25-page mini-encyclopedia within the book which includes sections headed Indian Cooking Made Easy; Cookware and Tools; Tips and Techniques; Freezing, Refrigerating and Reheating Methods; and Essential Indian Ingredients.  Did you know that in India “curry” is a plant and also means ‘gravy’ or ‘sauce’ and not the blend of spices developed by English colonists; that the bright red color of tandoori chicken comes from the addition of coloring (!); and that carom seeds (a new one for me) aid in settling upset gassy tummies?   The book has helpful tips accompanying many recipes; some including instructional photos showing the important steps.

I have had limited success with cooking Indian food because I was usually following recipes with a mind-boggling array of spices and complicated and long-winded cooking methods.  After less than stellar results, my family would drop hints about “going out for Indian” more often!  That’s not the case with Shubhra’s Saag Paneer.  It’s my favorite Indian dish and the first recipe I made from her book.   Hubs and I finished it off quickly and I made more a few days later.  It is easy to make and it’s full of spicy flavor!  For part of the spinach, I substituted chard and kale that I harvested in the beautiful garden of Ralph Smith Photography.   The garden is an organic wonder that provides herbs, fruits and vegetables year round, some of which are used in Ralph’s photo shoots.

   005 v1007 v1

A colorful feast for the eyes

004 v1

Creamy and spicy with home made paneer

034 v1

“Palak” Paneer slightly adapted from Shubhra Ramineni’s Saag Paneer

Serves 4

1 pound (500g) fresh chard, washed, de-ribbed and coarsely chopped

1 pound (500g) fresh spinach, washed, trimmed and coarsely chopped, or a 10-ounce (285g) package of frozen spinach

2 ripe tomatoes, quartered

1 teaspoon ground turmeric

¼ to ½ heaping teaspoon cayenne pepper

½ teaspoon salt

½ teaspoon freshly ground black pepper

3 tablespoons vegetable oil

3 teaspoons finely grated fresh ginger

1 small onion, diced

1 – 2 serrano peppers, diced

1 recipe Paneer (Indian cheese), cubed and pan-fried, see recipe below

½ cup (125ml) heavy cream, or more to taste

Place chard, spinach and tomato in a medium saucepan over medium heat. If you’re using frozen spinach add ½ cup water. Cook for 7 minutes, stirring occasionally.

Add turmeric, red pepper, salt and black pepper. Stir to combine and cover. Simmer for 15 minutes, stirring occasionally. The greens will become soft and tender and the tomatoes will become mushy. Remove from heat and puree using an immersion blender or transfer contents to a blender and puree until smooth.

Pour the oil into a small skillet and place over medium heat. When the oil is hot, add the ginger, onion and serrano pepper. Sauté until the onion is browned, stirring frequently, about 4 minutes. Pour into the saucepan with the greens. Add the paneer (cheese cubes) and heavy cream and stir to combine. Simmer for 5 minutes over medium heat, stirring occasionally. Enjoy immediately or cool and refrigerate for later.

020 v1

Paneer (Indian cheese)

Makes ¼ pound (125g)

4 cups (1 liter) whole milk

juice of 1 lime

Pour milk into a heavy medium pot. Bring to a rolling boil over high heat, stirring frequently as it comes to a boil. Don’t let it boil over. Immediately reduce the heat to medium-low.

Add lime juice and stir for about 45 seconds or until the milk separates into curds (solids) and whey (liquid). If the milk does not separate add more lime juice - 2 teaspoons at a time – until it separates.

Fold a large piece of cheesecloth to create four layers. Line a colander with cheesecloth and place it over a large bowl to catch the whey. Pour the curds into the cheesecloth. Let the whey drain through the cheesecloth into the bowl.

Gather the sides of the cheesecloth to create a bundle and press it against the side of the pot to squeeze out the excess whey. Be careful as it will be hot.

Place the bundle on a plate. Unfold the cheesecloth and with your hands, mold the cheese, now paneer, into a square block about ¾-inch thick. Fold the cheesecloth back over the paneer.

Pour the whey into the pot that the milk boiled in. Place the pot on top of the paneer and allow the rest of the whey to drain out, about 30 minutes.

Remove pot and discard the whey. Unfold the cheesecloth. Transfer the paneer to a plate and cover with plastic wrap. Refrigerate for a minimum of one hour and up to one day before using.

To fry Paneer:  Cut the paneer into ¾-inch cubes. You should get about 16 or so. Pour 3 tablespoons of vegetable oil into a non-stick skillet over medium heat. When the oil is hot, add the cubed paneer. Fry the cubes until they are lightly browned on all sides, turning very carefully to retain their shapes. Remove from skillet and drain on a plate that has been lined with a paper towel.

041 v1

Prijatno!

Thursday, September 30, 2010

Asparagus, tomato and Gruyère tart

030 v1

This colorful vegetable tart is the reason favorite Daughter is hooked on asparagus!   I came across this simple recipe in Martha’s vast recipe collection several years ago and it has been requested many times.   Served as an appetizer or main dish when accompanied with a soup or salad, this tart has a handful of ingredients and is very easy to prepare  – it fits right into a young lady’s busy college schedule.  

I have been fortunate to have children that love vegetables.  We were never a fast-food family as that option was not available to my parents in South Africa when I was little.   My kids ate what was served at our dinner table and our extended family feasts from the get-go.   I was spared the drama of picky eaters and watched their friends exhibit some strange behaviors.  One young neighbor never ate at our home.   He subsisted on a diet of chicken nuggets alone.   I’m sad to see that he is now an obese young man.   Another young girl asked me what that whole bird was I had sitting in a roasting pan.  It was a chicken… And I once come across a kid at the check-out counter that could not recognize broccoli (!) so he couldn’t look up the PLU code.   It’s no wonder we are now in the midst of a health crisis with no change in sight.

When it comes to asparagus,  I always buy the bunch with the thinnest spears and fresh buds.    It’s just a personal preference, but any thickness is good.   An excellent provider of Vitamin K, folate, Vitamins C and A, asparagus is also a natural diuretic and is high in antioxidants.

This recipe combines the flavors or asparagus and Swiss-made Gruyère cheese.  They pair beautifully together and it’s no wonder – they are both common items in the Swiss kitchen.  Here I have added sliced cherry tomatoes to the mix for a beautiful and delicious presentation.

001-crop v2   

Asparagus, tomato and Gruyère tart  adapted from a recipe by Martha Stewart

a little flour for the work surface

1 sheet frozen puff pastry

5½ ozs (2 cups) Gruyère cheese, grated

1½ pounds thin or medium asparagus

8 cherry tomatoes, sliced in half

1 tablespoon olive oil

salt and pepper

Preheat oven to 400ºF.

On a floured surface, roll the puff pastry into a 16-by-10-inch rectangle.  Trim uneven edges.  Place pastry on a baking sheet (I line mine with a silpat).  With a sharp knife, lightly score pastry dough 1 inch in from the edges to mark a rectangle.  Using a fork, pierce dough inside the markings at 1/2-inch intervals.

Sprinkle pastry with Gruyère.  Trim the bottoms of the asparagus spears to fit crosswise inside the tart shell. Arrange asparagus and tomato halves in a single layer over Gruyère.  Brush with oil and season with salt and pepper.  Bake until spears are tender, 20 to 25 minutes.  Remove from oven and cool for 5 minutes.

Cut tart with a pizza cutter into desirable pieces.  Serve hot.

 007 v1

Make sure you sprinkle some cheese on the edges too! 

032 v1

Prijatno!
Thursday, September 9, 2010

Hatch chilies in scalloped potatoes and gruyere cheese

030-crop v1

If ever there is too short a season for a flavorful vegetable it has to be Hatch pepper season.  Two to three weeks is all we get and if you’re not paying attention, you might miss the call of these extraordinary chilies.  The arrival of Hatch chilies from New Mexico around mid-August is a much anticipated event in Houston.   It’s when my favorite grocery stores, Central Market and H.E.B roll out the rotating cages, crank up the fires and for a few lively weeks excite our senses during the Hatch Chile Festival. 

The aroma of roasting Hatches emanating from the parking lots act as a magnet to pepper lovers miles away.   As if we haven’t already perspired enough through the hot and humid summer, the Hatch heat index sweats our foreheads and clears our sinuses with spice levels from mild to very hot.   Live music adds to the festivities and a feeling of merriment and well-being follows!   In what must be a highly lucrative operation, Central Market has included Hatch chilies in products such as sausage, guacamole, meatballs, crab cakes, tortilla chips, bread and even granola and brownies.   They know a good thing when they see it!

A good char intensifies the deep rich green flesh and easily releases the thin skin.  Because the Hatch’s flesh is delicate, a quick tumble in the cage over flames for only 7 –10 minutes is all it takes.   I let the experts roast mine every year and purchase several pounds.  They freeze well and I plan to enjoy them in soups, stews and omelets for months to come.  

Hatch chilies are not a seed variety but are named after the village of Hatch in southern New Mexico around which they are farmed.  Considered to be the chili capital of the world, the area exports over 250,000 chilies to Texas alone!   For a recent family gathering I decided to add chopped roasted hatch peppers to scalloped potatoes.    The chilies complemented the sharpness of the gruyere, and the cream…enough said!  

Hatch chili scalloped potatoes with baby back ribs and green beans033 v1

Layer upon layer020 v1

Hatch chilies in scalloped potatoes and gruyere cheese

8 russet potatoes, peeled, sliced crosswise as thin as possible. This is a good time to use a mandoline slicer, if you own one.

4 cups whipping cream or half-and-half

5 -6 roasted Hatch chilies (spicy or mild), peeled, stemmed, seeded and finely chopped

8 ounces gruyere cheese, coarsely grated

salt and freshly ground black pepper, to taste

Have a 9 x 13 casserole dish ready. Pour about 2 tablespoons of cream or half-and-half on the bottom of the dish and spread evenly.

Arrange potato slices evenly in a layer on the bottom of the dish. The potatoes should be touching but not overlapping each other. Sprinkle about 1 – 2 tablespoons of chilies on top of the potatoes. Sprinkle about ¼ cup of gruyere cheese on top of the chilies and potatoes. Season with salt and freshly ground black pepper. Pour about ½ cup of cream or half-and-half over cheese.

Continue layering potatoes, chilies, cheese, salt, pepper and cream. End with a layer of potatoes and then gruyere cheese. Pour the rest of the cream over the potatoes.

Heat oven to 400ºF. Cover the potatoes with foil. Bake for 1 hour.

After an hour, remove the foil. Bake for another 10 minutes or until the potatoes are soft when pricked with a fork, the cream is set and the top is nicely browned.

Remove from the oven and allow potatoes to rest for about 10 minutes.

 Creamy, spicy, gooey deliciousness!045 v1

Prijatno!

Friday, August 13, 2010

Potato Salad with red peppers and mustard vinaigrette

008 v1

The quintessential summer meal in America must include a potato salad.   No barbeque or picnic would be complete without this comfort food!   There are as many versions of potato salad as there are varieties of the potato - would you believe over 5,000 with 3,000 originating in the Andes alone?  

Soothing to the tongue and neutral in flavor, potatoes are a versatile starchy tuber that lend themselves to many interpretations and flavors.   In Eastern Europe vinegar and oil are the preferred dressings over mayonnaise.   This version has a little of each.   Hot cooked new potatoes are first tossed in vinegar which allows their starch to absorb its acidity.   The acidity is balanced by a thin coating of creamy mayonnaise, grainy Dijon mustard, crisp chopped red peppers and a few pungent scallions. 

No peeling is necessary as this salad is made with new potatoes.  Favorite daughter has a fit when she sees me peeling any variety of potato…and with good reason:  much of the fiber and nutrients are housed in the potato peel which acts as a jacket to keep the nutrients inside the potato during the cooking process.

Unfortunately potatoes have received a bad rap since the emergence of low carbohydrate diets.   I have recently discovered that they have enormous nutritional value and are considered by many to be one of mother nature’s whole foods.   Yes, they are high in carbohydrates (21% of the recommended daily allowance - RDA), but of that percentage 26% is beneficial fiber. 

Vitamins galore!  Potatoes contain a variety of important vitamins and high amounts in several.   Vitamin C has 48%of the RDA!  Vitamin B6 46%!  Niacin and Folate 21% each, Thiamin 13%, and many more.   Now let’s talk minerals:  Potassium 46%, Manganese 33%, Magnesium and Phosphorus 21% each, and Iron and copper 18% each.   It contains no fat and because it’s a vegetable it has no cholesterol either.   One portion size is 1/3 lb or one medium potato.  Enjoy your potatoes so that your body can reap the benefits!

 Potato Salad with red pepper and mustard vinaigrette, adapted from Gourmet Magazine, June 2002

Makes 8 - 10 servings

4 lb fingerling or new potatoes, skin left on

½ cup diced red bell pepper

2 scallions (green onions), finely sliced
1 tablespoon sugar
½ cup walnut vinegar or white-wine vinegar, divided
2/3 cup finely chopped shallots
¼ cup coarse-grained Dijon mustard
1 tablespoon vegetable oil

1 tablespoon mayonnaise

salt and freshly ground black pepper, to taste

Cover potatoes with salted cold water. Bring to a boil and simmer, uncovered, until just tender, 20 to 25 minutes. Drain in a colander and cool slightly.

Whisk together sugar and 6 tablespoons vinegar in a large bowl until sugar is dissolved.

When potatoes are just cool enough to handle, peel and cut diagonally into 1/2-inch-thick slices if using fingerlings or cut in half if using new potatoes. Add potatoes to vinegar mixture and toss gently to combine. Add diced red pepper and scallions.

Whisk together shallot, mustard, vegetable oil, mayonnaise and remaining 2 tablespoons vinegar in a small bowl. Add dressing to potatoes, then season with salt and pepper and stir gently with a rubber spatula.

Serve immediately at room temperature or chill if serving later. 

001 v2

 Prijatno!

Wednesday, June 30, 2010

Grilled corn (esquite) with black beans, lime dressing and queso Cotija

024 v1One of my favorite aromas is grilled sweet summer corn emanating from Hispanic food stands and taco trucks.   Smoky and hot with the presence of a little char, roasted corn on the cob is becoming a common street food here in Texas as it is in Mexico.  Known as elote, corn is usually roasted in its husk.  When stripped but left attached at the end, the husk (also known as the shuck) becomes the handle with which one eats the corn.   Slathered with mayonnaise, lime and chili powder, it is one toothsome treat!

Cinco de Mayo Roasted Corn 009 v1

Elote that has been cut off the cob are called esquites, and that’s what I served my delightful bunco group at my Cinco de Mayo feast this year.  Served with traditional Mexican accompaniments of mayonnaise, lime juice, chili powder, cayenne pepper and Cotija cheese, I took my esquites one step further by adding black beans and scallions.   It was very well received!

Roasted corn (esquites) with black beans, lime dressing and queso Cotija

4 ears corn, husks on

½ – 1 can black beans (14-oz), rinsed and drained

2 scallions, chopped

Lime dressing (see below)

1/3 cup queso Cotija (Cotija cheese), crumbled

To roast the corn: Soak corn with husks intact in cold water for 30 minutes. Drain water and pat dry. Broil or grill corn, turning every few minutes, until the husks char and corn kernels are cooked but still firm, about 12 – 18 minutes depending on the intensity of the heat. Cool and remove husks. Cut kernels off the cob and place them in a bowl.

Add black beans, scallions and lime dressing. Toss to combine and top with crumbled Cotija cheese and sprig of cilantro.

Lime dressing:

1/3 cup mayonnaise (sour cream or yogurt would be fine as well)

2 teaspoons freshly squeezed lime juice

¼ teaspoon chili powder, or a little more to taste

¼ teaspoon cayenne pepper

¼ teaspoon cumin

¼ teaspoon salt

Combine sour cream or mayonnaise, lime juice, chili powder, cayenne, cumin and salt in a small bowl.  Set aside. 046 v1

 Prijatno!

Wednesday, June 9, 2010

Onion Jam

029 v1

I have always loved the taste of jams and preserves.  What can be better than fruit cooked with a healthy dose of sugar?  A picky eater as a youngster -- oh, how things have changed -- bread, butter and jam kept this overactive, skinny little girl happy.  Peanut butter and jelly was an unheard-of combination in South Africa so my sandwiches were filled with salted butter and exotic berry jams, apricot, plum or my all-time favorite fig. 

I still enjoy my jam and butter but it’s more likely to be on a single piece of toast since the calories add up a lot quicker now :(    With the increase in availability of a wide variety of cheeses from all over the world and locally by our very own artisans (try Blue Heron Farm), a new way of enjoying preserves has emerged.   Chunky preserves can complement a pungent, rich cheese with its texture and sweetness;  fig jam is a perfect partner to tangy goat cheese.  

A mind-boggling array of delicious savory jams has emerged in recent years.  Chipotle peppers cannned with peaches or raspberries, ginger with figs, and blueberries with garlic are just a few that come to mind.  Here’s the simple recipe for Onion jam that I served with Walnut bread and Humboldt Fog chèvre (goat cheese) as seen in my previous postWhen cooked slowly, the onions are allowed to absorb the sugar, soy sauce, wine and vinegar.  Once the water in the liquids has evaporated the mixture becomes thick, jammy and complex in flavor…sweet, salty, a tad sour…umami... and perfect with chèvre. 

This savory jam would also be an outstanding accompaniment to a roast beef or turkey sandwich.  It would be delicious with a freshly grilled steak or on a vegetable pizza.  The thought of it mingling with melting queso in a quesadilla makes my mouth water!.  Get creative with it…it’s worth the 45 minutes or so of stirring!

Onion Jam from the Mustards Grill Napa Valley Cookbook

Makes about 1 cup

1 tablespoon extra virgin olive oil

2 cups sliced onions; I have used both yellow and red

2 tablespoons sugar

½ teaspoon soy sauce

1 tablespoons balsamic vinegar

2 tablespoons red wine

2 tablespoons water

Heat the olive oil in a skillet over medium heat. Add the onions and cook for 5 - 8 minutes until tender and translucent. Add the sugar and cook, stirring occasionally, for 15 - 20 minutes, until onions are golden brown. Add the remaining ingredients and cook, stirring often to avoid scorching, for about 20 minutes, until the mixture is thick and jam like.  Taste and adjust for salt, if necessary.  The slower you cook it, the richer the jam will become. Store tightly covered in the refrigerator for up to 2 weeks.

030 v1

Prijatno!

Tuesday, May 11, 2010

Strawberry and blackberry shortcakes with Grand Marnier whipped cream

086 v1

It’s finally berry season and these strawberry and blackberry shortcakes went over very well at a meeting with my foodie friends at a backyard barbeque recently.   Slightly sweet and very tender, these shortcakes are a cinch to make.   Similar to scones and Southern biscuits, shortcakes contain a ‘healthy’ dose of shortening (or my preferred butter) which creates a “short” and delicate crumb.   Filled with lightly sweetened whipped cream and a combination of fresh summer berries soaked in a little bit of orange decadence (aka Grand Marnier), this dessert prettily announces the beginning of Summer.

As wonderful as all berries are, I had a major run-in with them in Oregon during a wine-tasting trip in the Willamette Valley.  It was late September and much to my delight I found the country roads surrounding our Bed and Breakfast lined with enormous wild blackberry bushes - hundreds of them – loaded with thousands upon thousands of blackberries at different stages of ripening!  These impressive, sometimes 12-foot tall plants use boundary fences and posts as support for their thorny, entangled canes.   They provide a wonderful feast for the birds for several months and I was astounded that so many perfectly ripe and sweet berries were left to rot.   I couldn’t wait to get my mitts on them!

Oregon Sept 08 105-crop v1

Fearless of the possibility of snakes which make the bushes their habitat, I dove in and moved from branch to branch and ate more than I was putting into my Ziploc.  I was not intimidated!   I conquered!   Unable to pace myself midst such glorious fruit, I became an uncontrollable glutton.   Here was my chance to load up for free on vitamin C, vitamin K, manganese, fiber, and oh yeah…I forgot…sugar!  

It was a morning (and sometimes evening) ritual, with a healthy dose of wine-tasting in between (I know…more sugar).  I had totally ignored the warnings of my friend Ralph, who predicted my affliction.   In a couple of days my mouth was reeling from a serious overgrowth of yeast.   Generously fueled by my greed and the sharp increase in sugar, I had a veritable bloom of yeast buds splurging in my mouth.   It was not a pleasant feeling and nothing short of a drastic change in diet and a few pills would stop it.  

But don’t let me stop you from enjoying these shortcakes with berries…in moderation of course!  Our group is planning a wine-tasting trip to Washington state this fall...

050 v1

Strawberry and blackberry shortcakes with Grand Marnier whipped cream

Makes about 10 – 16 shortcakes. Adapted from Baking From My Home to Yours by Dorie Greenspan

3½ cups all-purpose flour

2 tablespoons baking powder

¾ teaspoons salt

6 tablespoons sugar

1½ sticks (12 tablespoons cold unsalted butter), cut into small chunks

1½ cups cold heavy cream

Center a rack in middle of oven. Preheat oven to 425ºF. Line a large baking sheet with a silpat or parchment paper.

Whisk the flour, baking powder, salt and sugar together in a large bowl. Add the chunks of butter and quickly work it in the flour with your hands or a pastry cutter until the butter is the size of small peas.

Pour the cream over the mixture and mix it gently with a fork until the dough is just combined but there is still flour on the bottom of the bowl. Use your hands to form a rough ball but don’t overwork the dough or it may become tough.

Dump the dough onto a lightly floured surface and roll it out with a rolling pin to about ¾-inch thickness. Using a 2-inch or 3-inch cookie cutter, cut circles out and place on prepared baking sheet about 2 inches apart. Collect the scraps, re-roll and cut more dough circles. Bake for 15 - 18 minutes, turning the cooking sheet around about half way through the baking time. When the shortcakes are light golden brown, remove them from the oven and transfer them to a rack to cool.

When ready to serve, slice each shortcake horizontally in half. Place the bottom half on a serving plate and top with a couple of spoonfuls of the berries and whipped cream. Top with remaining half of shortcake and dust with confectioner’s sugar.

Strawberries and blackberries in Grand Marnier

2 lbs strawberries and blackberries (the proportion is up to you)

¼ cup sugar

2 tablespoons Grand Marnier

Wash berries and place on clean kitchen towel to dry. Hull strawberries and then slice them into thirds. Transfer strawberries and blackberries to a bowl. Add sugar and Grand Marnier and mix gently. Set aside to macerate for about an hour.

Grand Marnier whipped cream

2 cups heavy whipping cream

2 tablespoons confectioner’s sugar

1 tablespoon Grand Marnier

1 teaspoon vanilla essence

1 teaspoon orange zest

Whip cream and sugar in a bowl until it begins to thicken. Add Grand Marnier, vanilla essence and orange zest.   Whip carefully until it’s thick.  

088 v1

Prijatno!

Thursday, April 22, 2010

Baby bella mushroom tart

051 v1

In Italy, France, eastern Europe and Russia, foraging for mushrooms in the spring and fall is a national pastime.   You know that the season is under way when neighbors behave strangely - avoiding eye-contact while discreetly wandering in the direction of the woods and emerging casually with a bounty neatly tucked out of sight in coat pockets!  Similarly, when you see cars parked in disarray on the side of the road, you can be pretty sure that scavengers are secretly searching for mushrooms in the damp woodland areas nearby.   Secrecy and protection of the fruitful sites are carried through generations, and it is rude to ask where where the mushrooms were found.

There is a magical quality to mushrooms.  I am always amazed at their instant appearance on my lawn after a rainy spell.  But because I’m mycophobic (like most of us in America) when surprised by mushrooms that have the potential of being poisonous, I don’t venture to even touch them, let alone consider eating them!  In Europe the attitude is decidedly mycophilic and children are taught to identify the edible from the poisonous at an early age.  If you are in France and there is any doubt in your mind, you can conveniently take your harvest to a pharmacist - they are all trained to identify them.

During our stay at the amazing Villa Ferraia in Tuscany, my wine group and I were treated to an afternoon of foraging in the cool, humid woods.   Amateurs at best, we were accompanied by an expert woodsman who spoke not a word of English and nodded ‘yes’, and ‘no’ to our findings.   Stefano is the culinary director at the Villa.   Here’s his find – a huge portobello!   Mushrooms flourish in humus, the decaying vegetation found on moist soil around trees and under brush. 

2006 09 Italy 117 v1

We were very fortunate to find a few ovoli mushrooms that day!   In researching for the name of this bright orange mushroom, I discovered that they are very rare.   They have brilliant orange caps and white stems and are very expensive to buy if you are lucky enough to find them at market.  

2006 09 Italy 126-crop v1

Always eaten raw, they were sliced thinly and wonderful paired with a local Chianti. 

2006 09 Italy 150-crop v1

Mushrooms can be called the ‘meaty’ vegetable because of their high protein content.  They can easily replace meat to balance a meal.  In this mushroom tart, I use dried porcini mushrooms and young portobello mushrooms, also known as ‘baby bellas’.   A little brandy and salty parmesan to the mix enhance the earthiness of this hearty tart.

004-crop v1

Baby bella mushroom tart

Adapted from the Torta Salata recipe in Bologna Mia by Loretta Paganini.  Serves 8

Tart dough

2 cups all-purpose flour

1 teaspoon sea salt

8 tablespoons unsalted butter, cubed in 1” pieces and chilled

2 egg yolks

5 tablespoons ice water

Filling

¼ cup dried porcini mushrooms, soaked in hot water to cover for 30 minutes (reserve water after draining)

2 tablespoons olive oil

1 small red onion, finely chopped

2 cloves garlic, minced

2 20 oz packages Baby Bella mushrooms, brushed clean of any dirt, stems removed and thinly sliced 

¼ cup brandy

1 - 1½ teaspoons sea salt (to taste)

1 teaspoon freshly ground black pepper

½ teaspoon red pepper flakes

¼ cup chopped fresh parsley

2 large eggs

1 cup whipping cream

½ teaspoon freshly ground white pepper

pinch of freshly ground nutmeg

1/3 cup parmesan cheese, grated

To make the tart dough:  Place flour, salt and butter in food processor (or bowl).  Pulse (or work quickly with your hands) until the butter is the size of peas.  Add egg yolks and ice water and pulse until the mixture forms a mass.  If it’s still dry, add more water, one teaspoon at a time.  Shape into a flattened ball and wrap in plastic or foil and refrigerate for at least 30 minutes.

Butter a 9” tart pan with a removable bottom.  Sprinkle lightly with flour.  On a floured counter, roll out the dough to about an 11” circle.  Carefully transfer the dough to the tart pan.  Pat the dough so that it is snug in the bottom and sides of tart pan and trim the excess from the edge of the pan.  Prick the bottom at 1” intervals with the tines of a fork.  Chill while you prepare the filling.

011 v1

To make the filling: Preheat the oven to 400ºF.  In a large saucepan, heat the oil.  Add the onions, garlic, mushrooms and drained porcini mushrooms.  Sauté over high heat for about 10 minutes, or until the vegetables begin to soften.  Add the brandy and porcini water and cook over low heat for about 20 minutes and the mixture begins to dry out.  Add salt, black pepper, red pepper flakes and parsley and combine. Remove from heat and allow the mixture to cool.

In a small bowl, whisk the eggs, cream, white pepper, nutmeg and parmesan cheese until combined.  Add to the cooled mushroom mixture and mix well.  Pour the filling into the prepared crust and bake for 35 – 40 minutes, or until deep golden brown on the top.

Cool on a rack and serve warm or at room temperature.

026 v1    Prijatno!

Thursday, April 8, 2010

Sautéed fresh garbanzo beans

030 v1

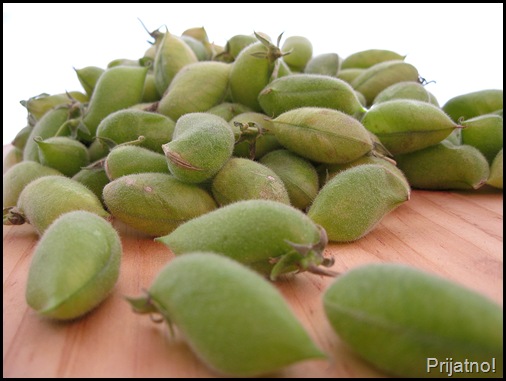
If you blink at the wrong time during early spring, you may miss the fleeting presence of fresh garbanzo beans, still in their small, fuzzy green pods.   Also known as chickpeas, ceci beans, Indian peas, Bengal gram and Kabuli chana, we are much more familiar in the US with garbanzos in canned or dried forms before they become the key ingredient in hummus, falafel, Indian vegetarian curries and Italian salads. 

I first spied fresh garbanzos as recently as last year.   Popping the beans out of their pods and savoring their green, sweet, and slightly nutty essence transported me far from the hectic, crowded city to a spacious country porch, a rocking chair and visions of me shelling garbanzos…I was well on my way to eating the entire bag by the time I arrived home!   Similar to green pea pods but smaller, their shells are thinner, hairy and paper-like.  One or two peas occupy each pod.  This picture shows how they are sold at markets in Mexico - fresh pods still attached to their branches.  The leaves are used to make sun tea and the branches are fed to the burros!   In the US you will pay a little more since you’re only buying the pods.   If you a lucky enough to come across some at your market or grocery store, grab some! 

This is how I found them

023 v1

Sadly, most of the crops in California support the dried garbanzo market.   Hopefully, with more families embracing a farm-to-table approach to their diets, these wonderful legumes will become a seasonal staple .   I recently read about a California farmer and his support of his Hispanic foreman’s “agricultural fantasy” - selling fresh garbanzos to “Gringos”!  When they introduced them at a market in San Francisco, Hispanic women delighted in the fresh crop, while the “Gringas” were not so easily charmed, especially put off by the chilling thought of, heaven forbid, shelling the beans themselves!!!  (Link to the entire article).     For people as particular as they are, sautéing them in their shells as I did below saves shelling time and they can be eaten like edamame – each person shelling his or her own.

In Mexico and from the Eastern Mediterranean to India, fresh garbanzos are eaten raw as well as cooked, and in many areas they are considered the poor man’s protein.  Aside from being high in protein, these nutritious little gems are also high in fiber and potassium .   My recent batch made it home with only a few beans eaten!   I decided to process them minimally so that they retain some of the raw “green” nutty taste that I hunger for.  A quick sauté did the trick for me, but you could also toss the pods in a little bit of olive oil and roast them at 425F for 25 – 30 minutes for a creamier texture.

055 v1

Heat a little bit of olive oil in a pan.  Carefully add the fresh garbanzo beans.  They will quickly begin jumping like popping corn!  

012v1

When the shells are charred on both sides, sprinkle with chile powder, cayenne pepper and kosher salt, to taste.  Finish with a squeeze of fresh lime juice.

058 v1

This simple snack is my entry to Magic Bullet To Go Giveaway, for which you can find details @ Fun and Food Cafe. You could win a Magic Bullet Food processor!  It’s easy!

Prijatno!

Sunday, April 4, 2010

Easter Babka

028 v1

This magnificent babka is a traditional Polish Easter bread that I made for my best friend’s annual Easter celebration.  Standing six inches tall, it is a slightly sweet yeast cake dotted with rum-soaked golden raisins and topped with a sweet lime glaze.  Rich in flavor thanks to 10 egg yolks, 2 whole eggs and melted butter, this babka is a fine way to break the Lenten fast!

Babka is the Northern Slavic word for “little grandmother”.  The bread is baked in a special pan that shapes the babka to emulate a full skirt covering the ample hips of a typical Eastern European grandmother.   The pan has ridges and curves suggesting the pleats and flowers of the fabric.  Unfortunately I don’t own a babka pan, so my large angel food cake pan became an acceptable stand-in.  

Thanks, Dorota for allowing me to make your babka this year!   Your Easter feasts are well-known and always a joy.

042 v1


Babka (adapted from Valinda’s recipe on Allrecipes)

1/3 cup rum, optional – if you want to soak the raisins*

3/4 cup golden raisins

1 cup milk or half-and-half

1/2 cup water

1 tablespoon sugar

2 1/2 (.25 ounce) packages active dry yeast

2 eggs, room temperature

10 egg yolks, room temperature

3/4 cup unsalted butter (1 1/2 sticks), melted and cooled but still warm

2 teaspoons vanilla extract

2 teaspoons lime zest

6 1/3 cup all-purpose flour, plus about 1 cup more for kneading

*If you want the raisins to be plump and delicious, soak them in the rum the night before or at least 2 hours before you start the recipe. 

Warm the milk, water and sugar until it reaches 110F (45C).    Add yeast and set aside for about 5 minutes.   Lightly oil a large bowl and set aside.   Drain raisins and enjoy the rum while you bake!

Stir 2 eggs, egg yolks, butter, vanilla and lemon rind in a large bowl of a mixer.   Using the paddle attachment,  mix in yeast mixture and raisins and beat well.   When a loose dough has formed, turn out onto a well-floured floured surface and knead until smooth, about 10 minutes, using the extra 1 cup of flour if necessary.   Place the dough in the oiled bowl and turn to coat on all sides with the oil.   Cover with a damp cloth and let rise in a warm place until doubled in volume, about 45 minutes.   Deflate the dough by punching it down and folding it over onto itself about 4 times.   Let rise again until doubled in volume, about 30 minutes.

Grease a babka pan or a large angel food cake pan.  Deflate the dough again and turn it out onto a lightly floured surface.   Shape it into a fat cylinder.  Place it into the babka or cake pan and fold over the ends.   Smooth the top with your hands until the dough is evenly dispersed.   Cover the pan with a damp cloth and let the dough rise until tripled in volume, about 40 minutes.  Meanwhile, preheat oven to 375F (190C).

Bake in preheated oven 10 minutes. Reduce oven temperature to 325F (165C) and bake for 30 minutes more. Reduce oven temperature to 275F (135C) and bake for another 15 to 20 minutes, until golden brown.   Let babka stand 5 to 10 minutes before removing from pan and cooling on a rack.

The Icing

2 cups confectioner’s sugar

2 tablespoons milk

1 teaspoon lime zest

1 tablespoon lime juice

1 teaspoon vanilla

Mix above ingredients together.  Add more milk or sugar to achieve a pouring consistency.  Pour over the warm babka. 

047 v1

Peace and joy as we celebrate our Lord’s resurrection today! 

Hristos voskrese!

Prijatno!

Thursday, March 25, 2010

Avocado and poblano pepper omelette

028 v1

Everyone knows that I’m a huge fan of avocados, so much so that I have even experimented with it in a cheesecake!  Sunny South Africa, where I spent my formative years, was abundant with many varieties of fruits and vegetables and amongst them was the wonderful avocado.   My parents, young immigrants from the former Yugoslavia, had never seen an avocado, paw paw (papaya), granadilla (passion fruit) or guava before and gradually incorporated these nutritious and heavenly fruits into our diets (mom’s fruit salads were always the best!).  My father, upon his first taste of the avocado, deemed it needed salt and pepper, and from then on, my mother made sandwiches with mashed avocado, salt and pepper and they were simple but very tasty.  A wholesome food such as the avocado doesn’t need much primping, according to mama!  I still enjoy these sandwiches and the memories they evoke.

A long time staple of the middle Americas (earliest evidence of it is from 10,000 BC!), the avocado tree is native to the tropics.  The mild-flavored flesh is almost always consumed raw in salsas, dips and salads.   High in monosaturated fats (the best kind) and potassium (the mineral that keeps those pesky leg cramps at bay!), the avocado is also a factor in reducing cholesterol and consistently appears at the top of many healthy food lists. 

I try to incorporate it in our salads, sandwiches, tacos and another salad, and now, in a delicious omelette.  The buttery, rich texture of the avocado lends itself well to this preparation.  As it warms, its subtle flavor and creamy texture contrast with its surroundings -  bold onions, sweet red peppers and spicy poblano.  I highly recommend it!

The headliners…chopped cilantro, red onion, jalapeno, red pepper, poblano pepper, green onions and avocado:

001-crop v1

Sauté the vegetables in a pan.  When they are starting to soften, pour the beaten eggs over them and sprinkle with salt and pepper to taste

011 v1

013 v1

Using a wooden spoon or a spatula, push the egg mixture from the edges inward and tilt the pan so that the runny raw egg from the middle falls onto the pan and starts to cook.  Cover half of the egg mixture with the cheese of your choice and the avocados, and then flip the exposed end over to enclose them. 

020 v1

022 v1

Avocado omelette

For 2 very generous portions (we like our eggs, what can I say!)

¼ red onion, chopped finely

1 jalapeno, seeded and chopped finely

1/3 red bell pepper, chopped finely

1 green onion, thinly sliced

¼ cup chopped cilantro

4 eggs, beaten

salt and pepper, to taste

½ avocado, seeded, peeled and cubed

2 slices provolone cheese, mozzarella, feta, chevre, cream cheese, or whatever cheese you fancy that would melt quickly

Have all of the above ingredients prepared before you begin to cook the omelette.  Over medium heat, heat about a tablespoon of olive oil in a saucepan.  Add the onion, jalapeno, red bell and sauté for about 3 minutes.  Add the green onions and  cilantro and cook for about 2 more minutes.  Spread the vegetables out evenly in the pan. 

Pour the beaten eggs over the vegetables evenly.  Sprinkle with salt and pepper.  Let eggs cook for about a minute or two (the edges will be cooked but the top will still be raw).  Using a wooden spoon or a spatula, push the egg mixture from the edges inward and tilt the pan so that the runny raw egg from the middle falls onto the pan and starts to cook.  Cover half of the egg mixture with the cheese of your choice and the avocados, and then flip the exposed end over to enclose them.  Remove from heat and cover with a lid.  Allow to sit for about 5 minutes so that the cheese melts and the avocado warms. 

Crispy egg, spicy peppers, gooey cheese and warm avocado makes for a delicious breakfast!

025 v1

Prijatno!

Thursday, March 4, 2010

Apple galettes with Vanilla bean goat’s milk ice cream and Blue Heron Farm cajeta

010-crop v2

I have never met a goat cheese I didn’t like!  Who can resist the rich layered cake-like wonder that is Humboldt Fog, a perfect French crottin or the red wine-soaked Drunken Goat?   I’ll never forget my first taste of chèvre.  It was a young crottin, covered in chopped walnuts and then toasted so that the cheese was warmed through. It garnished a green salad at lunch years ago at the Château de Chenonceaux in the Loire Valley.  The setting: perfect, the chèvre: a revelation!

Blue heron farm goatBut I had never tasted fresh raw goat’s milk until recently.  It is marvelous!   While preparing for a dinner for our wine group, I visited Blue Heron Farm in Field Store Community near Waller, Texas.  Owners and artisans Lisa and Christian Seger were our special guests and provided their highly regarded chèvres for several items on the menu.  Expecting a gaminess beyond what my cow’s milk-trained palate could savor, I poured some over my granola for breakfast and was blown away by the mild sweetness and ever so subtle tang (which becomes more prominent when the milk is transformed into chèvre).  It was a delicious treat I enjoyed all week.  .

SPOILED GOATS, FRESH CHEESE exclaims the banner at the entrance to the Seger’s ten-acre property.  Forgoing quantity for quality, they have chosen the sweet-natured, long-eared Nubian goats that produce milk that is high in butterfat and mild in flavor.  It’s kidding season, and after meeting the adorable babies and their curious mamas, I left with a variety of creamy chèvres, cajeta (caramel) for dessert, and two quarts of freshly harvested goat’s milk.   The milk that I didn’t consume with breakfast I used to make a lovely Vanilla bean ice cream (recipe below). 

If you live in the Houston area you can find the Seger’s chèvre at several outdoor markets.  I suggest you reserve your portion…they are always the first to sell out!  You can also arrange for a tour and tasting at the farm. 

Our dessert was warm individual Apple galettes made by our friend Helen.  Vanilla bean goat’s milk ice cream and Blue Heron Farm cajeta were the perfect accompaniments.  If you have never tasted cajeta from Blue Heron Farm, I urge to do so!  It’s always fresh, all natural and contains no fillers.  It’s the perfect pouring consistency and I admit that I’m addicted to it!

Vanilla bean goat’s milk ice cream

Makes 1 1/2 quarts

1 cup sugar

2 tablespoons cornstarch

2 pinches of salt

4 cups fresh raw goat’s milk (No guarantee that it will be good with commercially produced goat’s milk)

½ vanilla bean pod

2 eggs

Bring a little water (about ½”) to a simmer in the bottom of a double boiler.  Whisk sugar, cornstarch and salt in the top bowl of a double boiler. Place on top of simmering water.  Slowly add goat’s milk, whisking continuously until the mixture is hot and thickens a little, about 20 minutes.

On a cutting board, split the vanilla bean pod in half lengthwise with a pointed knife.  With the sharp tip of the knife, scrape the vanilla seeds (caviar) out and add the bean pod and seeds to the milk mixture.

Beat eggs in a separate bowl until the yolks and whites are combined.  Ladle about ½ cup of the hot milk into the eggs and whisk together quickly to prevent them from curdling.   Add the eggs to the rest of the milk mixture and cook over the simmering water for an additional 5 minutes, but make sure that it doesn’t boil.

Cool milk custard in an ice water bath, stirring every few minutes.  Chill overnight in the refrigerator.

Strain the chilled custard through a sieve and discard the vanilla bean.  Freeze the custard by following the directions to your ice cream maker.

 010-crop v3

Apple galettes

Adapted from Susan Spungen’s Almond Berry Tart  from More magazine.  Makes 8 galettes.

Crust

½ cup sliced or slivered almonds

1½ cups flour

½ teaspoon salt

1 teaspoon sugar

1½ sticks cold unsalted butter, cut into small pieces

¼ cup ice water

Filling

4 cups thinly sliced peeled, cored and quartered apples

½ lemon, juiced or 2 tablespoons

½ cup sugar

2 tablespoons all-purpose flour

For the top

Sliced almonds

Coarse ‘crystal’ sugar or Turbinado sugar

To make the crust, combine the almonds, flour, salt and sugar in food processor.  Pulse to combine.  Add butter and pulse until the pieces are the size of peas.  With the machine running, quickly add the water.  Stop the machine just when the dough begins to come together.  Remove the dough and knead once or twice.  Shape into a disc and wrap in plastic.  Refrigerate for at least 1 hour.

Preheat oven to 375F.  Line a large cookie sheet with parchment or a silpat.

In a medium bowl, combine the filling ingredients. Set aside.

On a well-floured surface, cut the dough into 8 equal pieces.  Roll each piece with a rolling pin until it measures about 6 – 7 inches.   Pile sliced apples evenly on each piece of dough, leaving a 2-inch border. Fold the border over the filling, leaving some of the apples exposed.  Brush the dough gently with cold water and then sprinkle with crystal sugar and sliced almonds.

Bake until the crust is golden brown, about 30 - 45 minutes.

Remove from oven and let cool for 5 minutes before serving with goat’s milk ice cream and cajeta.

020-crop v1

Prijatno!