Showing posts with label Daring Bakers. Show all posts

Friday, October 9, 2009

Mastering puff pastry and vols-au-vent

vol-au-vent 017-crop v2

Kitchens should be getting cooler in the northern hemisphere…says Steph innocently from her home in Sydney.  No such cooling took place in good old Texas in September, where temperatures were still reaching the 90’s and when I was supposed to post this Daring Bakers challenge.

I’ve baked with lots of purchased puff pastry in the past (“Mom, can you make pastries for breakfast today?”) but I have never taken the time to make it from scratch.  Now I remember why!  If you live in Texas, my friends, it’s an all-day process during the month of September!  We’re still struggling to keep our homes cool, so the conditions are not exactly conducive to a process that requires keeping the butter solid cold while you perform a series of turns which creates the flakiness of the dough.  Roll, fold, turn, chill and wait; roll, fold, turn, chill and wait again; roll… and so it went all day long.  The key to successful puff pastry is to keep the butter from playing hookie on your counter instead of being obediently enveloped in the dough while you’re rolling it.  A cool marble countertop cool to look at and cool to the touch would be sooo perfect for this project…note to self –  make sure you get at least one marble countertop for making pastries when you redo the kitchen!   

DBMiss Measure_v150x200I’m not a master yet when it comes to making puff pastry, but it was good enough to produce the vols-au-vent (literally “windblown” for its airiness), pictured above.  Vols-au-vent are typically served hot and are filled with a creamy savory filling.  I filled them with a chilled fresh Crab Salad –  who wants to heat up the stove in 90 degree weather?  

The September 2009 Daring Bakers' challenge was hosted by Steph of A Whisk and a Spoon. She chose the French treat, Vols-au-Vent based on the Puff Pastry recipe by Michel Richard from the cookbook Baking With Julia by Dorie Greenspan.  Thanks Steph for organizing the challenge and thanks to Lis and Ivonne for rocking the Daring Bakers every month with their cool challenges!

…

Vols Au Vent:
Michel Richard’s Puff Pastry Dough
From: Baking with Julia by Dorie Greenspan
Yield: 2-1/2 pounds dough.  If you are interested in making your own puff pastry and/or vols-au-vent, please click
here to see the recipe and a detailed explanation.  Also included are helpful instructional videos.  The selected instructions below describe my pictures only.

Place the block of cold butter (the beurrage) in the middle of the dough (the détrempe) and fold the ears over the butter, stretching them as needed so that they overlap slightly and encase the butter completely.  This dough/butter packet is called a paton and is rolled and folded repeatedly (turning).fall veggies and vol-au-vent 030-crop v2

Then, keeping the work surface and the top of the dough well floured to prevent sticking, roll the dough into a rectangle that is three times as long as the square you started with, about 24" …With this first roll, it is particularly important that the butter be rolled evenly along the length and width of the rectangle; check when you start rolling that the butter is moving along well, and roll a bit harder or more evenly, if necessary, to get a smooth, even dough-butter sandwich (use your arm-strength!). fall veggies and vol-au-vent 043 v1

The total number of turns needed is six…However, no matter how you arrange your schedule, you should plan to chill the dough for at least an hour before cutting or shaping it. fall veggies and vol-au-vent 050 v2  
Bake the shells until they have risen and begin to brown, about 10-15 minutes depending on their size. vol-au-vent 003 v1 
Crab Salad  enough to fill about 12 vols-au-vent, but also good on a bed of lettuce!

1 pound fresh lump crabmeat (none of that rubbery imitation stuff, ok?)

¾ cup red bell pepper, finely chopped

2 shallots or ½ red onion, finely diced

2 jalapenos, finely diced

zest of 1 lime

juice of 2 limes

leaves of about 10 stems of cilantro, roughly chopped

1 tablespoon white wine vinegar

3 tablespoons extra virgin olive oil

salt and freshly ground black pepper, to taste

2 scallions, sliced thinly on the diagonal

Pick through the crabmeat to remove any scales.

Place red bell pepper, shallots or red onion, jalapenos, lime zest, lime juice, cilantro, vinegar and olive oil in a bowl. Whisk to blend. Add salt and pepper to taste.

Add crabmeat and gently mix it in. Top with scallions and serve with salad greens or in vols-au-vents.

vol-au-vent 012-crop v1

Prijatno!

Sunday, August 2, 2009

Daring Bakers’ Challenge: Chocolate Covered Marshmallow Cookies

DB Mallows076-crop v1 

Husbie is a huge fan of Nabisco’s Pinwheels Pure Marshmallow and Chocolate Cookies.  Alas, the fresh ones are only available in Texas during the winter months because the chocolate won’t melt during shipping.   So he was pleasantly surprised when I presented him with a Pinwheel, freshly made in our own kitchen, the chocolate coating still shiny and warm.

DBMiss Measure_v150x200 I had never thought of making them before I found out that the Daring Bakers’ Challenge for July was Mallows, a recipe by the Chicago-based pastry chef Gale Gand.  Based on the same concept:  a crisp cookie base, gooey marshmallow filling topped with a dark chocolate glaze - it’s a study in contrasting textures and flavors.  And the best part of it all is that we are enjoying my homemade attempt as we speak, during the hot Houston summer. 

Here’s the company line:  The July Daring Bakers' challenge was hosted by Nicole at Sweet Tooth. She chose Chocolate Covered Marshmallow Cookies and Milan Cookies from pastry chef Gale Gand of the Food Network. 

Thanks Nicole for choosing this challenge, and as always, thanks to Lis and Ivonne for founding our intrepid group of bakers and always keeping us on our toes!

Mallows (Chocolate Covered Marshmallow Cookies)
Recipe courtesy Gale Gand

My comments are in blue.

About 2 dozen cookies

• 3 cups (375grams/13.23oz) all purpose flour
• 1/2 cup (112.5grams/3.97oz) white sugar
• 1/2 teaspoon salt
• 3/4 teaspoon baking powder
• 3/8 teaspoon baking soda
• 1/2 teaspoon ground cinnamon
• 12 tablespoons (170grams/ 6 oz) unsalted butter
• 3 eggs, whisked together

• Homemade marshmallows, recipe follows
• Chocolate glaze, recipe follows

In a mixer with the paddle attachment, blend the dry ingredients.  On low speed, add the butter and mix until sandy.  Add the eggs and mix until combine.  Form the dough into a disk, wrap with Clingfilm or parchment and refrigerate at least 1 hour and up to 3 days.
When ready to bake, grease a cookie sheet or line it with parchment paper or a silicon mat.  Preheat the oven to 375 degrees F.  Roll out the dough to 1/8-inch thickness (my cookie base was on the thick side, so make sure to roll the dough out thin), on a lightly floured surface. Use a 1 to 1 1/2 inches cookie cutter to cut out small rounds of dough.  Transfer to the prepared pan and bake for 10 minutes or until light golden brown. Let cool to room temperature.

Pipe a “kiss” of marshmallow onto each cookie. Let set at room temperature for 2 hours.

DB Mallows3
Line a cookie sheet with parchment or silicon mat.  One at a time, gently drop the marshmallow-topped cookies into the hot chocolate glaze.  I placed the cookies on a rack over a bowl and spooned the glaze over until the top and sides were covered.  I let them sit for a while to cool and moved them gently with a spatula.  Lift out with a fork and let excess chocolate drip back into the bowl.  Place on the prepared pan and let set at room temperature until the coating is firm, about 1 to 2 hours.

DB Mallows1

Note: if you don’t want to make your own marshmallows (Cheaters!), you can cut a large marshmallow in half and place on the cookie base. Heat in a preheated 350-degree oven to slump the marshmallow slightly, it will expand and brown a little. Let cool, and then proceed with the chocolate dipping. 

Homemade marshmallows:
• 1/4 cup water
• 1/4 cup light corn syrup
• 3/4 cup (168.76 grams/5.95oz) sugar
• 1 tablespoon powdered gelatin
• 2 tablespoons cold water (I used about 2 tablespoons more)
• 2 egg whites , room temperature
• 1/4 teaspoon pure vanilla extract

In a saucepan, combine the water, corn syrup, and sugar; bring to a boil until “soft-ball” stage, or 235 degrees on a candy thermometer.  Sprinkle the gelatin over the cold water and let dissolve.  Remove the syrup from the heat, add the gelatin, and mix.  Whip the whites until soft peaks form and pour the syrup into the whites.  Add the vanilla and continue whipping until stiff.  Transfer to a pastry bag.

Chocolate glaze:
• 12 ounces semisweet chocolate
• 2 ounces cocoa butter or vegetable oil

Melt the 2 ingredients together in the top of a double boiler or a bowl set over barely simmering water.  The glaze was easy to pour because was on the thin side, but it didn’t set completely.  Next time I will use less oil.

And if you get tired of the traditional shape, jazz up your selection with some sandwich cookies!

 Mallows 006 v1

  Prijatno!

Sunday, May 31, 2009

Daring Baker’s challenge: Apple Cherry Strudel

DB Strudel (10) v1

This month’s Daring Baker’s challenge brought back many memories of my dear maternal grandmother. It was fascinating for a little girl like me to watch my ‘Baba’ as she miraculously transformed a small ball of dough into a thin sheet of pastry that draped the entire kitchen table, including a generous vertical on all sides that headed towards the floor!

At the time, of course, I could only imagine that I would be making my own strudel dough one day. As an adult, I always believed it to be too delicate a process that required a lot of experience and skill…NOT! It is so easy to make and much tastier than the purchased frozen fillo sheets. I think I’m even going to convince my sister, Vesna, who regularly makes apple strudel, to give it a try.

My ‘Baba’s’ strudel filling was made of apples that were grated and not chopped. When apples are grated and combined with sugar and cinnamon, they release a lot of their juices. This sweet, cinnamon-y apple juice is the best byproduct of all, and it’s that which my siblings and I fought over! Today, I savored the sweet juice once again, and privately toasted my Baba and thanked Linda and Courtney for choosing apple strudel for this month’s DB challenge.

DBKitchen logo

The May Daring Bakers’ challenge was hosted by Linda of make life sweeter! and Courtney of Coco Cooks. They chose Apple Strudel from the recipe book Kaffeehaus: Exquisite Desserts from the Classic Cafés of Vienna, Budapest and Prague by Rick Rodgers.

Apple strudel
from “Kaffeehaus – Exquisite Desserts from the Classic Cafés of Vienna, Budapest and Prague” by Rick Rodgers

1 1/3 cups (200 g) unbleached flour
1/8 teaspoon salt
7 tablespoons (105 ml) water, plus more if needed
2 tablespoons (30 ml) vegetable oil, plus additional for coating the dough
1/2 teaspoon cider vinegar

1. Combine the flour and the rest of the ingredients in a medium size bowl. Mix together with a spoon until combined. If it is dry, add a little more water.

2. Transfer to a work surface and knead by hand, using a sparse amount of flour, if necessary. Knead for about 5 minutes, and pick up the dough and throw it down hard onto your working surface occasionally. Shape the dough into a ball and lightly oil it on all sides with olive oil. Transfer it to a plate. Cover the ball with plastic wrap. Allow to stand for 30-90 minutes, the longer the better.

3. It would be best if you have a work area that you can walk around on all sides like a 36 inch (90 cm) round table or a work surface of 23 x 38 inches (60 x 100 cm). Cover your working area with a table cloth, dust it with flour and rub the flour into the fabric. Put your dough in the middle and pat it out as much as you can. Pick the dough up by holding it by an edge. The weight of the dough and gravity will help stretch it as it hangs. Use the back of your hands to gently stretch and pull the dough. You can use your forearms to support it as well.

4. When the dough becomes too large to hold, put it on the table cloth. Continue to gently stretch the dough as you walk around the table. If it tears, keep on going – it won’t be noticeable when it’s rolled up. Place your hands underneath the dough and stretch and pull the dough using the backs of your hands. You will have a thick edge that may hang over the edge of the table.

When the dough measures about 2 feet (60 cm) wide and 3 feet (90 cm) long, cut away the thick dough around the edges with scissors. The dough can sit for a few minutes while you make the filling, but do not let it dry out. Preheat oven to 400°F (200°C). Line a large baking sheet with parchment paper. Grease parchment lightly with a little melted butter.

Apple and Cherry filling (my version)

  • 1/2 cup plain crumbs, lightly toasted
  • 1/2 cup walnuts, toasted and ground
  • 1 tablespoon brown sugar
  • 4 tablespoons unsalted butter, melted

Combine crumbs, walnuts and brown sugar in a small bowl. Using a spoon, sprinkle about 3 tablespoons of melted butter on dough and spread it gently with your fingers. Sprinkle the crumb/nut mixture on dough, as shown below.

DB Strudel4

  • 4 Granny Smith apples, or any other tart apple
  • 4 tablespoons brown sugar
  • 1 teaspoon cinnamon
  • 1/2 cup cherries, pitted and halved

Peel the apples and grate them using the coarse side of a grater. Place them in a bowl and add the sugar and cinnamon. Let apples sit for about 10 minutes so that the juices are released. Using your hands, squeeze grated apples gently, leaving most of the apple juice in the bowl. Transfer apple to another bowl. Add cherries and combine.

The delicious apple juice is in the glass

DB Strudel (4)-crop v1

Spread the apple filling along one long edge of the dough. Grasp the tablecloth with both hands and lift it up so that the dough and filling roll up to the other end. At this point you can curve the roll into a U-shape and place it on the baking sheet, or cut it into two long rolls and place them side by side on the baking sheet. Brush the top and sides of the roll with the remaining melted butter. Bake at 400°F (200°C) for about 20-30 minutes or until nicely browned.

DB Strudel (7)-crop v1

Cool on rack for about 30 minutes. To finish, sprinkle some confectioner’s sugar on top of strudel through a sieve.

Very flaky!

DB Strudel (17)-crop v1

Prijatno!

Monday, April 27, 2009

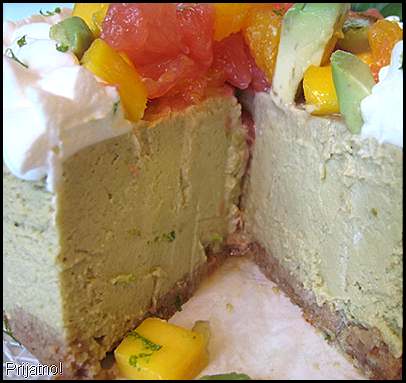
Sweet avocado cheesecake with mango and citrus ‘salsa’

avocado cheesecake3

Sounds weird, I know!

1. I had half a dozen ripe avocados staring at me from the fruit basket and

2. I had a Daring Bakers Challenge to do. The challenge was to make a cheesecake and a basic recipe was posted with instructions to make it ‘unique’ and get creative with flavors and presentation.

Put these two entities together and what do you get? Sweet Avocado Cheesecake!

I remembered an avocado cheesecake a couple of years ago at the innovative Cafe Red Onion, a Latin fusion restaurant. It was delicious. Avocados, being neutral in flavor, lend themselves to savory or sweet renditions. I believed that the velvetiness would enhance the creamy texture of my cheesecake. I would add lots of lime juice in an attempt to keep the color fresh. I was so excited about the idea I began baking right away.

The verdict: I liked it! My neighbor, Carolina loved it! She couldn’t detect the taste of avocado at all. Her daughter thought it was a pretty good lime cheesecake. Husbie wouldn’t go near it! And my sister and her family expressed a distinct dislike for the texture and color. Thanks, Ve and co. for your honesty! My friend Alma did not care for it. Her charming son, Joey, thought it was ‘interesting’ but liked it! And her husband John… haven’t heard back from him yet!

So, I’d say it’s a clear winner!!! I guess it’s not for everyone!

The Daring KitchenThe April 2009 challenge is hosted by Jenny from Jenny Bakes. She has chosen Abbey’s Infamous Cheesecake as the challenge. You can click on her site to find the original recipe. Thanks to Jenny and the founders of the Daring Bakers, Lis and Ivonne for keeping the ‘daring’ in over a thousand bakers all over the world!

I modified Abbey’s Infamous Cheesecake a little so that I could incorporate the avocados and lime juice. Next time I make it (yes, there will be a next time), I will use one avocado less so that the cheesecake is a more pleasing color. Some people just couldn’t handle it! The mango and citrus ‘salsa’ is sweet and tart and is a nice contrast to the creaminess of the cheesecake.

Sweet avocado cheesecake with mango and citrus ‘salsa’ Make the cheesecake the day you plan to serve it because it needs to chill overnight. The ‘salsa’ should be made the day of serving (see instructions below).

  • Almond Crust
  • 1/4 cup almonds
  • 1/2 cups graham cracker crumbs
  • 2 tablespoons sugar
  • 5 tablespoons butter, melted

Put almonds in processor and pulse until finely chopped. Add graham cracker crumbs, sugar and melted butter and pulse until blended but still crumbly. Pat into the bottom and a little up the sides of a 9” springform baking pan (I made two small cakes – one 5” round, and one 6 1/4” round). Set aside.

avocado cheesecake4

  • Cheesecake batter
  • 2 packages cream cheese, softened to room temperature
  • 1 cup sugar
  • 3 eggs
  • 1 teaspoon vanilla essence
  • 2-3 (I’d go with 2) ripe avocados, peeled and pitted
  • zest of 1 lime
  • 1/4 cup fresh squeezed lime juice
  • 1 cup sour cream
  • 1 tablespoon rum
  • pinch of salt

Prepare a water bath by half filling a shallow roasting pan with very hot water. Place the pan on the lowest rack in the oven. Place another rack in the middle of the oven. Preheat oven to 300 degrees F.

In a mixer, combine cream cheese and sugar. Beat on medium speed until smooth. Add vanilla and eggs, one at a time until all are incorporated.

Place avocados in a food processor. Blend until very smooth. Add zest, lime juice, sour cream, rum and salt. Blend well.

Add avocado mixture to cream cheese mixture and blend on low speed until well blended. Pour into cake pan. Place pan on middle rack in oven. If you’re using a 9” pan, bake for 45 minutes than check to see if it set but still a little ‘jiggly’ in the middle after you bump the pan a little.

Remove from oven and cool completely on a rack. Chill overnight.

  • Avocado ‘Salsa’
  • You can make the salsa without the avocado ahead of time. Peel and cut avocado not too long before you plan to serve it so that it doesn’t discolor.
  • 1/2 ripe avocado, peeled and cut into 1/2 inch pieces
  • juice of 1/2 lime
  • 1 orange, peeled and segmented then cut into 1/2 inch pieces.
  • 1/2 grapefruit, peeled and segmented then cut into 1/2 inch pieces
  • 1 mango, peeled, flesh cut into 1/2 inch pieces
  • 1/2 teaspoon lime zest

Combine avocado and lime juice in medium bowl. Add the rest of the ingredients and let it sit for about 5 minutes. Place fruit mixture in a sieve and drain juices off before decorating cheesecake.

avocado cheesecake1

Prijatno!

Avocado on Foodista

Wednesday, April 1, 2009

Lasagne Verdi al Forno and home made spinach pasta!

DBlasagne5

When I first ate lasagna in Italy, I was surprised at how different the dish was to lasagna typically served in the US. Gracious Patrizia at Villa Ferraia served us her version during a fantastic week at Ferraia’s culinary school (can you find this blogger in the kitchen?). It was light, very flavorful, and composed of thin layers of pasta, béchamel and meat sauce .

According to Lynne Rossetto Kasper, author of The Splendid Table, lasagne should always be a “vivid expression of the ‘less is more’ philosophy of cooking. Mere films of béchamel sauce and meat ragu coat the sheerest spinach pasta. Parmigiano-Reggiano cheese dusts each layer. There is nothing more; no ricotta, no piling on of meats, vegetables or cheese; little tomato, and no hot spice. Baking performs the final marriage of flavors. The results are splendid.”

Does that description sound like your typical tall stacked and heavy American-style lasagna? Definitely not! But if you’ve never had authentic lasagna, you’re missing something special.

Our Daring Baker’s challenge for March was to make authentic lasagne (plural), and particularly the lasagne verde, or spinach egg pasta. I’m always ready for a challenge with this group, founded by Lis and Ivonne! You rock!

The Daring Baker’s March 2009 challenge is hosted by Mary of Beans and Caviar, Melinda of Melbourne Larder and Enza of Io Da Grande. They have chosen Lasagne of Emilia-Romagna from The Splendid Table by Lynne Rossetto Kasper as the challenge. Click on any of these sites to find the entire recipe.

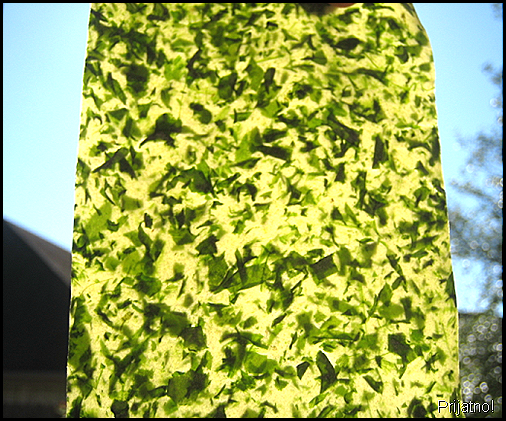
Making the lasagne was a lot easier than I expected. Only three ingredients are needed – eggs, spinach and flour. I used frozen chopped spinach, squeezed it well to remove excess liquid and chopped it by hand (and not a food processor), so my spinach was more on the chunky side:

DBlasagne1

But look at what I created! A beautiful green sheet which reminded me of stained glass when held up to the sun! The goal was to get the lasagne as thin and transparent as possible. D’ya think I succeeded?

DBlasagne4

I chose to roll the dough using a traditional rolling pin and my brute strength (of which I have none!). Fortunately, I was aided by a live broadcast from the Metropolitan Opera of Wagner’s Nordic epic Das Rheingold. I had gods, thunder, and fire coursing through my veins as I pushed, turned and pulled the dough. Live from the Met – your timing was perfect!

Lasagne sheets were left to dry for a few hours:

DBlasagne3

The béchamel sauce was also simple to make using butter, flour, milk pepper and freshly grated nutmeg:

DBlasagne2

The ragu (meat sauce) was to die for! It took about 4 hours to make from beginning to end and included amongst other ingredients pancetta, beef, pork, prosciutto and sweet carrots. Surprisingly there was no garlic and no herbs, yet it had so many levels of flavor, with wine uniting them all. The wine was the key ingredient in the sauce, in my opinion, and here is a good example of why one should use quality wine when cooking. Husby was kind enough to open a Rabbit Ridge 2002 Paso Robles L.P.R. Grand Reserve. It was sooo yummy and jammy and fruity, I sipped, chopped and stirred…then I sipped again! I lived up to my license plate frame my daughter bought me that says:

I love to cook with wine. Sometimes I even put it in the food!

The end product was a ragu I’ll be making many times, using quality wine, of course!

Assembly was easy. I chose to bake the lasagne uncovered because I love a crisp and toasted cheesy top! Served with red wine…

DBlasagne6

Prijatno!

Thursday, January 29, 2009

Terrific Tuiles! Another Daring Bakers Challenge!

DBtuiles4 

I love the Daring Bakers Challenges!  I have made many fancy desserts in the past, but this group is introducing me to baking I have not attempted before.  That’s because I thought the recipes were daunting and beyond the capabilities of my domestic kitchen.   Thanks to the founders, Lisa and Ivonne for creating this group and for keeping us in line!  You rock! 

I was at first hesitant about making tuiles because they look so delicate and finicky.  My friend, Chantal, who has made every fancy culinary treat under the sun, convinced me that there was nothing to them.  Easy for you to say, my Belgian princess -  you were raised on Godiva chocolates, truffles and Hermes scarves!

Tuiles (or cornets) are traditionally thin, crispy almond cookies that are molded over a rolling pin or mold while still hot.  Once cooled, the tuiles resembled the curved French roofing tiles for which they are named. 

This month's challenge is brought to us by Karen of Bake My Day and Zorra of 1x umruehren bitte aka Kochtopf.
They have chosen Tuiles from The Chocolate Book by Angélique Schmeink and Nougatine and Chocolate Tuiles from Michel Roux.

After sifting through the eight page DB document, I decided that I was going to make the savory tuiles from Thomas Keller’s The French Laundry Cookbook.  Once the butter softened up a little, the batter was sooo easy to make - it took just a few minutes.  I decided on an accompaniment of shrimp  with a light sour cream filling.   We were told to think light, in opposition to the extravagant Yule Log we baked in December (if you’ve seen it, you’ll know what I mean!).

DBtuiles6

Here are the recipes:

Savory Tuiles/Cornets
From Thomas Keller "the French Laundry Cookbook" 

My changes are in italics

1/4 cup plus 3 tablespoons (65 grams/2.1/4 ounces) all purpose flour
1 tablespoon plus 1 teaspoon sugar
1 teaspoon kosher salt (= 2/3 teaspoon table salt) I would use less, about 1/2 teaspoon
8 tablespoons (114 grams/4 ounces) unsalted butter, softened but still cool to the touch
2 large egg whites, cold
2 tablespoons black sesame seeds

In a medium bowl, mix together the flour, sugar and salt. In a separate bowl, whisk the softened butter until it is completely smooth and mayonnaise-like in texture. Using a stiff spatula or spoon, beat the egg whites into the dry ingredients until completely incorporated and smooth. Whisk in the softened butter by thirds, scraping the sides of the bowl as necessary and whisking until the batter is creamy and without any lumps. Transfer the batter to a smaller container, as it will be easier to work with.
Preheat the oven to 400 degrees F.
Make a 4-inch hollow circular stencil (I used the cardboard back of a notepad and cut a 4.5” circle). Place Silpat on the counter (it is easier to work on the Silpat before it is put on the sheet pan). Place the stencil in one corner of the sheet and, holding the stencil flat against the Silpat, scoop some of the batter onto the back of an offset spatula and spread it in an even layer over the stencil. Then run the spatula over the entire stencil to remove any excess batter. After baking the first batch of tuiles/cornets, you will be able to judge the correct thickness. You may need a little more or less batter to adjust the thickness of the tuiles/cornets.

I was able to fit 3 tuiles (which measured 4.5” in diameter each) on a 11x17 silpat:

DBtulies1


There should not be any holes in the batter. Lift the stencil and repeat the process to make as many rounds as you have molds or to fill the Silpat, leaving about 1 1/2 inches between the cornets.  Sprinkle each tuile/cornet with a pinch of black sesame seeds. 
Place the Silpat on a heavy baking sheet and bake for 4 to 6 minutes, or until the batter is set and you see it rippling from the heat. The tuiles/cornets may have browned in some areas, but they will not be evenly browned at this point.
Open the oven door and place the baking sheet on the door.  This will help keep the tuiles/cornets warm as you roll them and prevent them from becoming too stiff to roll. Flip a tuile/cornet over on the sheet pan, sesame seed side down and place 4-1/2 inch tuile/cornet mold at the bottom of the round. If you are right-handed, you will want the pointed end on your left and the open end on your right. The tip of the mold should touch the lower left edge (at about 7 o'clock on a clock face) of the cornet.
Fold the bottom of the cornet and around the mold; it should remain on the sheet pan as you roll. Leave the cornet wrapped around the mold and continue to roll the cornets around molds; as you proceed, arrange the rolled cornets, seams side down, on the sheet pan so they lean against each other, to prevent from rolling. 

I carefully lifted each tuile and draped it over an aluminum mold similar to a cupcake mold turned upside down.   This is the result when cooled:

DBtuiles2

When all the tuiles/cornets are rolled or shaped, return them to the oven shelf, close the door, and bake for an additional 3 to 4 minutes to set the seams and color the cornets a golden brown. If the color is uneven, stand the cornets on end for a minute or so more, until the color is even. Remove the cornets from the oven and allow to cool just slightly, 30 seconds or so.
Gently remove the tuiles/cornets from the molds and cool for several minutes on paper towels. Remove the Silpat from the baking sheet, wipe the excess butter from it, and allow it to cool down before spreading the next batch. Store the tuiles/cornets for up to 2 days (for maximum flavor) in an airtight container.

And here’s my recipe for the filling:

Sautéed Shrimp with Sour Cream Wasabi Mousse

1/3 cup whipping cream

1/3 cup light sour cream

1 teaspoon wasabi paste (green Japanese horseradish in a tube)

1 tablespoon finely chopped green onion (plus a little more for garnish)

1 tablespoon finely chopped red pepper (plus a little more for garnish)

1/2 teaspoon freshly ground black pepper

10 jumbo shrimp, deveined, tails intact.

Salt, pepper, chili powder, olive oil

For the mousse:  Whip cream until it starts to hold its shape.  Add sour cream, wasabi and whip until thick and well-blended.  Fold in green onion, red pepper and black pepper.   Place in a piping bag fitted with a large tip (or just cut the end off the bag) and refrigerate until ready to fill the tuiles.

For the shrimp: Dry shrimp and sprinkle with salt, pepper and chili powder to taste.  Sauté in a little olive oil until cooked.  Cool slightly.

To assemble, place cooled tuiles on a serving plate.  Pipe about 2 tablespoons or so in each tuile.  Place shrimp on the edge of mousse and garnish with chopped green onion and chopped red pepper.

Then, impress your guests, including Chantal! I wish you were here to try them!

DBtuiles5 

Now that I’m a tool for tuiles, I’m going to try the sweet versions as well and report back to you!

Prijatno!

Saturday, January 3, 2009

Not your traditional French Mother's Yule Log!


It goes without saying that the ultimate Christmas cake is the Buche de Noel, or French Yule Log. Traditionally it is a chocolate rolled cake (jellyroll style), filled with a rich buttercream and decorated with rich chocolate icing. This icing is ridged to resemble the bark of a tree. Leaves, berries and mushrooms (made of meringue) decorate the log. All in all, it is a beautiful and delicious presentation for the end of a holiday meal.
This month's Daring Baker's Challenge is a modern take on the Yule Log. It is a layered construction consisting of six (6) different 'elements'. They are, from top to bottom: Icing, Creme Brulee layer, Mousse, Praline Feuillete (Crisp), Ganache layer and Dacquiose. Our challenge was to include all six elements and have fun,fun,fun with the flavorings, shape and decoration.
Yes, it was fun because I enjoy a challenge every now and again, but this challenge called for major organization. When I first printed all 15 pages or so, I was overwhelmed. Of course, it being the holiday season added to my apprehension. I triple punched the sheets and awarded them their own three-ring binder. I put them away for 3 weeks, with only a casual glance now and then. When I was finally able to sit down and make some decisions about flavors, I felt like a college student studying for finals! Fortunately, a container of crystallized ginger, gingersnaps and a bag of almonds jumped out at me from the pantry and the decision was made: Ginger, Chocolate and Almond Yule Log. Having eliminated many of the flavor options included in the recipe, I felt my task would be a lot simpler to execute!
I baked over a four day span. On the first day I made the Almond Dacquoise and the Ginger Creme Brulee layer. On day two I made the Praline for the Feuillete, the actual Praline Feuillete Crisp, and the Dark Chocolate Ganache. On the third day, I made the Dark Chocolate Mousse and assembled the log with little trouble and froze it. On New Year's Eve, I poured the Dark Chocolate Icing on the log and decorated it with fresh cranberries and holly leaves.
The dessert was very well received by my wine group buddies. The ginger flavoring took front seat and blended very well with the dark chocolate. The texture was smooth and creamy, with a surprise crunch from the Feuillete Crisp. The host couple called on New Year's Day, asking where I had stashed the leftovers! Well, there were none, since it generously served 13 people.

This month's challenge is hosted by Hilda of Saffron & Blueberry (http://saffronandblueberry.blogspot.com/) and Marion of (Il en faut peu pour etre heureux (http://ilenfautpeupour.canalblog.com/). Thanks ladies for organizing this major challenge!

The author of the recipe is Flore of Florilège Gourmand . The recipe can be found on her website: http://plaisirgourmand.perso.cegetel.net/index.html. Bakers: check out her website! It is amazing and full of photographs, technique tips and recipes! It is one of my 'favorites' and will be a valuable source for me.
About the recipe:
The recipe (I should say recipes), as printed, is not for the faint at heart. Bless the French, but they don't write recipes the way we do here in the States. Ingredients are not listed in order of use and some important steps in the method are completely left out. For those of us who have experience baking, it was merely an inconvenience. I have corrected these problems below, so the steps should be a lot easier for anyone to follow.
First, I dug deep into the netherlands of my kitchen cabinets to find my Rehrucken Mold. Yes, it's Rehrucken, with an umlaut over the 'u'. I even had to 'Google it' to find its name! From whence it came to my kitchen I have no recollection, but I've had it for many years and have never used it. It is an Austrian creation typically used to bake a 'Saddle of Venison' Cake' (strange, but true). The mold is also called a Moravian Loaf Pan or simply a Ribbed Cake Pan. I thought it would be perfect to shape this confection. Of course, you can use any large loaf or 9 - 10 inch cake pan. This is what the Rehrucken pan looks like:

Ginger, Chocolate and Almond Yule Log
The recipes below include my comments and changes made to the original recipes.


Almond Dacquoise (Almond Cake)
Equipment: 2 mixing bowls, hand or stand mixer with whisk attachment, spatula, baking pan such as a 10”x15” jelly-roll pan, parchment paper. This can be baked two days ahead and wrapped tightly in plastic wrap to keep fresh.

Ingredients:
1 cup almond meal (2.8 oz, 80g) I first toasted about 1/2 cup of raw almonds, then ground them and measured 1 cup of almond meal.
1/2 cup (50g, 1.75oz) caster (extra fine granulated) sugar
2Tbsp (15g) all-purpose flour
3 large egg whites
4 Tbsp (50g, 1.75oz) granulated sugar

1. Finely mix the almond meal and the caster sugar. (If you have a mixer, you can use it by pulsing the ingredients together for no longer than 30 seconds). Sift the flour into the mix.

2. Beat the eggs whites, gradually adding the granulated sugar until stiff.

3. Pour the almond meal mixture into the egg whites and blend delicately with a spatula.

4. Grease a piece of parchment paper and line your baking pan with it.

5. Spread the batter on a piece of parchment paper to an area slightly larger than your desired shape (circle, long strip etc...) and to a height of 1/3 inches (8mm). Bake at 350°F (180°C) for approximately 15 minutes (depends on your oven), until golden. Let cool and cut to the desired shape.

Ginger Crème Brulée Insert
Equipment: Small saucepan, mixing bowl, baking mold, wax paper
Note: The ginger crème brulée can be flavored differently by simply replacing the ginger with vanilla, cardamom, lavender, etc.
Ingredients:
1/2-cup (115g) heavy cream (35% fat content)
½ cup (115g) whole milk
2 teaspoons ginger juice
2 tablespoons grated fresh ginger
4 medium-sized (72g) egg yolks
0.75 oz (2 Tbsp / 25g) granulated sugar
1/2 teaspoon vanilla essence
1. Heat the milk, cream, and gingers to just boiling. Remove from the stove and let the gingers infuse for about 1 hour.
2. Whisk together the sugar and egg yolks (but do not beat until white).
3. Pour the ginger-infused milk over the sugar/yolk mixture. Mix well. Add vanilla essence.
4. Line your mold with aluminum foil, using a piece that is large enough to cover all sides without any edges at the bottom of the mold. Pour the cream into the mold and bake with a water bath at 210°F (100°C) for about 35 minutes to 1 hour or until firm on the edges and slightly wobbly in the center.
The most respected Tartelette (http://www.tartelette.blogspot.com/) says: You can bake it without a water bath since it is going to go inside the log (the aesthetics of it won't matter as much since it will be covered with other things).... BUT I would recommend a water bath for the following reasons:- you will get a much nicer mouth feel when it is done- you will be able to control its baking point and desired consistency much better- it bakes for such a long time that I fear it will get overdone without a water bath. Now...since it is baked in a pan and it is sometimes difficult to find another large pan to set it in for a water bath, even a small amount of water in your water bath will help the heat be distributed evenly in the baking process. Even as little as 1 inch will help.
5. Let cool and put in the freezer for at least 1 hour to firm up and facilitate the final assembly.
Praline Feuillete (Crisp) Insert
Feuillete means layered (as in with leaves) so a Praline Feuillete is a Praline version of a delicate crisp.
The original recipe for the Praline Crisp lists Gavottes. Gavottes are crisp lace-thin crepes. They are not available in the US. I chose not to make them, and substituted ground gingersnaps, in keeping with my flavor.
I also made my own Almond Praline, based on the recipe in the July 2008 challenge. Here it is:
2/3 cup sugar
1 cup raw almonds, lightly toasted
1. Line a baking sheet with parchment. Butter parchment.
2. Put the sugar in a small, heavy pan. Heat on low flame for about 10 minutes until the sugar starts to melt around the edges. Do not stir. Swirl the pan if necessary to melt the sugar. Stir quickly if the sugar in the middle doesn't melt. Remove from heat when caramel in color and sugar is melted.
3. Quickly add the almonds and stir to coat. Pour onto parchment and spread into a single layer of almonds. Cool completely.
4. When praline is cold, break it up and place it in a processor. Process until it's a fine powder.
Ingredients for the Praline Feuillete:
3.5 oz (100g) semi-sweet chocolate
1 2/3 Tbsp (25g) butter
2 Tbsp (1 oz / 30g) praline powder
2.1oz (60g) gingersnaps, ground in processor
1. Melt the chocolate and butter in a double boiler.
2. Add the praline and the ground gingersnaps. Mix quickly to thoroughly coat with the chocolate.
3. Spread between two sheets of wax paper to a size slightly larger than your desired shape. Refrigerate until hard.
Dark Chocolate Ganache Insert
Equipment: pan, whisk. Note: Because the ganache hardens as it cools, you should make it right before you intend to use it to facilitate piping it onto the log during assembly. You can also cover the hardened Creme Brulee Insert with plastic wrap and pour the ganache over it. Re-freeze. You will get the correct shape for the ganache.
Ingredients:
1.75 oz (4 Tbsp / 50g) granulated sugar
4.5oz (2/3 cup – 1 Tbsp/ 135g) heavy cream (35% fat content)
5 oz (135g) dark chocolate, finely chopped
3Tbsp + 1/2tsp (45g) unsalted butter softened
3/4 ounces crystallized ginger, finely chopped
1. Make a caramel: Using the dry method, melt the sugar by spreading it in an even layer in a small saucepan with high sides. Heat over medium-high heat, watching it carefully as the sugar begins to melt. Never stir the mixture. As the sugar starts to melt, swirl the pan occasionally to allow the sugar to melt evenly. Cook to dark amber color.
2. While the sugar is melting, heat the cream until boiling. Pour cream into the caramel and stir thoroughly. Be very careful as it may splatter and boil.
3. Pour the hot caramel-milk mixture over the dark chocolate. Wait 30 seconds and stir until smooth.
4. Add the softened butter and whip hard and fast. The chocolate should be smooth and shiny.
5. Add ginger and stir.

Foreground: Creme Brulee Insert, Middleground: Feuillette Crisp, Background: Ganache Insert


Dark Chocolate Mousse
Here I encountered a problem with the sugar syrup (see picture below). I also whipped the remaining cream at the end before I added it to the chocolate mixture to create a mousse consistency.
Equipment: stand or hand mixer with whisk attachment, thermometer, double boiler or equivalent, spatula Note: You will see that a Pate a Bombe is mentioned in this recipe. A Pate a Bombe is a term used for egg yolks beaten with sugar syrup, then aerated. It is the base used for many mousse and buttercream recipes. It makes mousses and buttercreams more stable, particularly if they are to be frozen, so that they do not melt as quickly or collapse under the weight of heavier items such as the crème brulee insert.
Ingredients:
.5 sheets gelatin or 5g / 2+1/4 tsp powdered gelatin
1.5 oz (3 Tbsp / 40g) granulated sugar
1 ½ tsp (10g) glucose or thick corn syrup
0.5 oz (15g) water
50g egg yolks (about 3 medium)
6.2 oz (175g) semi-sweet chocolate chips
1.5 cups (350g) heavy cream (35% fat content)
1. Soften the gelatin in cold water. (If using powdered gelatin, follow the directions on the package.)
2. Make a Pate a Bombe: Beat the egg yolks until very light in colour (approximately 5 minutes until almost white).
3. Cook the sugar, glucose syrup and water on medium heat for approximately 3 minutes (if you have a candy thermometer, the mixture should reach 244°F (118°C). If you do not have a candy thermometer, test the sugar temperature by dipping the tip of a knife into the syrup then into a bowl of ice water, if it forms a soft ball in the water then you have reached the correct temperature.

The temperature of the sugar syrup rose very quickly after 243F. In fact, it jumped to 268F but I decided to use it regardless. This is what I got: lovely icicles on my whisk and the sides of the bowl. Pretty, but not what the doctor ordered!


4. Add the sugar syrup to the beaten yolks carefully by pouring it into the mixture in a thin stream while continuing to beat the yolks. Continue beating until cool (approximately 5 minutes). The batter should become thick and foamy.

5. In a double boiler or equivalent, heat 2 tablespoons (30g) of cream to boiling. Add the chopped chocolate and stir until melted and smooth.

6. Pour the melted chocolate over the softened gelatin, mixing well. Let the gelatin and chocolate cool slightly and then stir in ½ cup (100g) of cream to temper. Add the Pate a Bombe.

7. Whip the rest of the cream and fold gently with a spatula into chocolate mixture.

Dark Chocolate Icing
I doubled the following recipe for the log. This is an amazing icing for cakes because it pours beautifully and freezes well. It also remains shiny and is easy to cut. I'll definately use it for bombes and other frozen cakes.
Equipment: Small bowl, small saucepan. Note: Because the icing jellifies quickly, you should make it at the last minute.
Ingredients:
4g / ½ Tbsp powdered gelatin or 2 sheets gelatin
¼ cup (60g) heavy cream (35 % fat content)
2.1 oz (5 Tbsp / 60g) granulated sugar
¼ cup (50g) water
1/3 cup (30g) unsweetened cocoa powder
1. Soften the gelatin in cold water for 15 minutes.
2. Boil the rest of the ingredients and cook an additional 3 minutes after boiling, stirring constantly.
3. Add to the chocolate mixture. Mix well.
4. Let cool while checking the texture regularly. As soon as the mixture is smooth and coats a spoon well (it is starting to jell), use immediately.
How To Assemble your French Yule Log:
THIS IS FOR UNMOLDING FROM UPSIDE DOWN TO RIGHT SIDE UP, AS I DID. You will want to tap your mold gently on the countertop after each time you pipe mousse in to get rid of any air bubbles.
Line your mold or pan, whatever its shape, with rhodoid (clear hard plastic, I usually use transparencies cut to the desired shape, it’s easier to find than cellulose acetate which is what rhodoid translates to in English) OR plastic film. Rhodoid will give you a smoother shape but you may have a hard time using it depending on the kind of mold you’re using. I lined my Rehrucken pan with plastic wrap.
Pipe one third of the Mousse component into the mold.
Take the Creme Brulee Insert out of the freezer at the last minute and set on top of the mousse. Press down gently to slightly ensconce it in the mousse.
Pipe second third of the Mousse component around and on top of the Creme Brulee Insert.
Cut the Praline/Crisp Insert to a size slightly smaller than your mold so that it can be surrounded by mousse. Lay it on top of the mousse you just piped into the mold.
Pipe the last third of the Mousse component on top of the Praline Insert.
Freeze for a few hours to set. Take out of the freezer.
Pipe the Ganache Insert onto the frozen mousse leaving a slight edge so that ganache doesn’t seep out when you set the Dacquoise on top.
Close with the Dacquoise. Freeze until the next day.
So the order is (from first down in the mold):
1) Dark Chocolate Mousse
2) Crème Brulee Insert
3) Mousse again
4) Praline/Crisp Insert
5) Mousse
6) Ganache Insert
7) Dacquoise
THE NEXT DAY...Unmold the log and set on a wire rack over a shallow pan.
Cover the cake with the icing. Let set. Return to the freezer.
You may decorate your cake however you wish. The decorations can be set in the icing after it sets but before you return the cake to the freezer or you may attach them on top using extra ganache or leftover mousse, etc... I decorated my log with fresh cranberries and holly leaves.
Transfer to the refrigerator two to three hours before serving, so the frozen parts have a change to soften a little. Slice log into 1/2 inch thick pieces. Serves about 14.


Prijatno!